• Book
    • Watercolor with Brush Pens
    • Watercolor Flowers Using Markers
    • Paint a Watercolor Galaxy Butterfly with Markers
    • Paint Watercolor Galaxy Bookmarks using Markers
    • Timelapse Video for Artists
  • Shop
  • Society6 Store
  • Blog
  • Portfolio
  • About
  • Contact
Menu

Brown Paper Bunny Studio

Art & Fashion Illustration
  • Book
  • Classes
    • Watercolor with Brush Pens
    • Watercolor Flowers Using Markers
    • Paint a Watercolor Galaxy Butterfly with Markers
    • Paint Watercolor Galaxy Bookmarks using Markers
    • Timelapse Video for Artists
  • Shop
  • Society6 Store
  • Blog
  • Portfolio
  • About
  • Contact
Watercolor Gift Tags by Jessica Mack of BrownPaperBunny

Watercolor Gift Tags

December 6, 2018

Please note: This blog post contains affiliate links, which help pay for the upkeep of this site. That being said, I will never, ever promote anything I am not 100% in love with!

----------

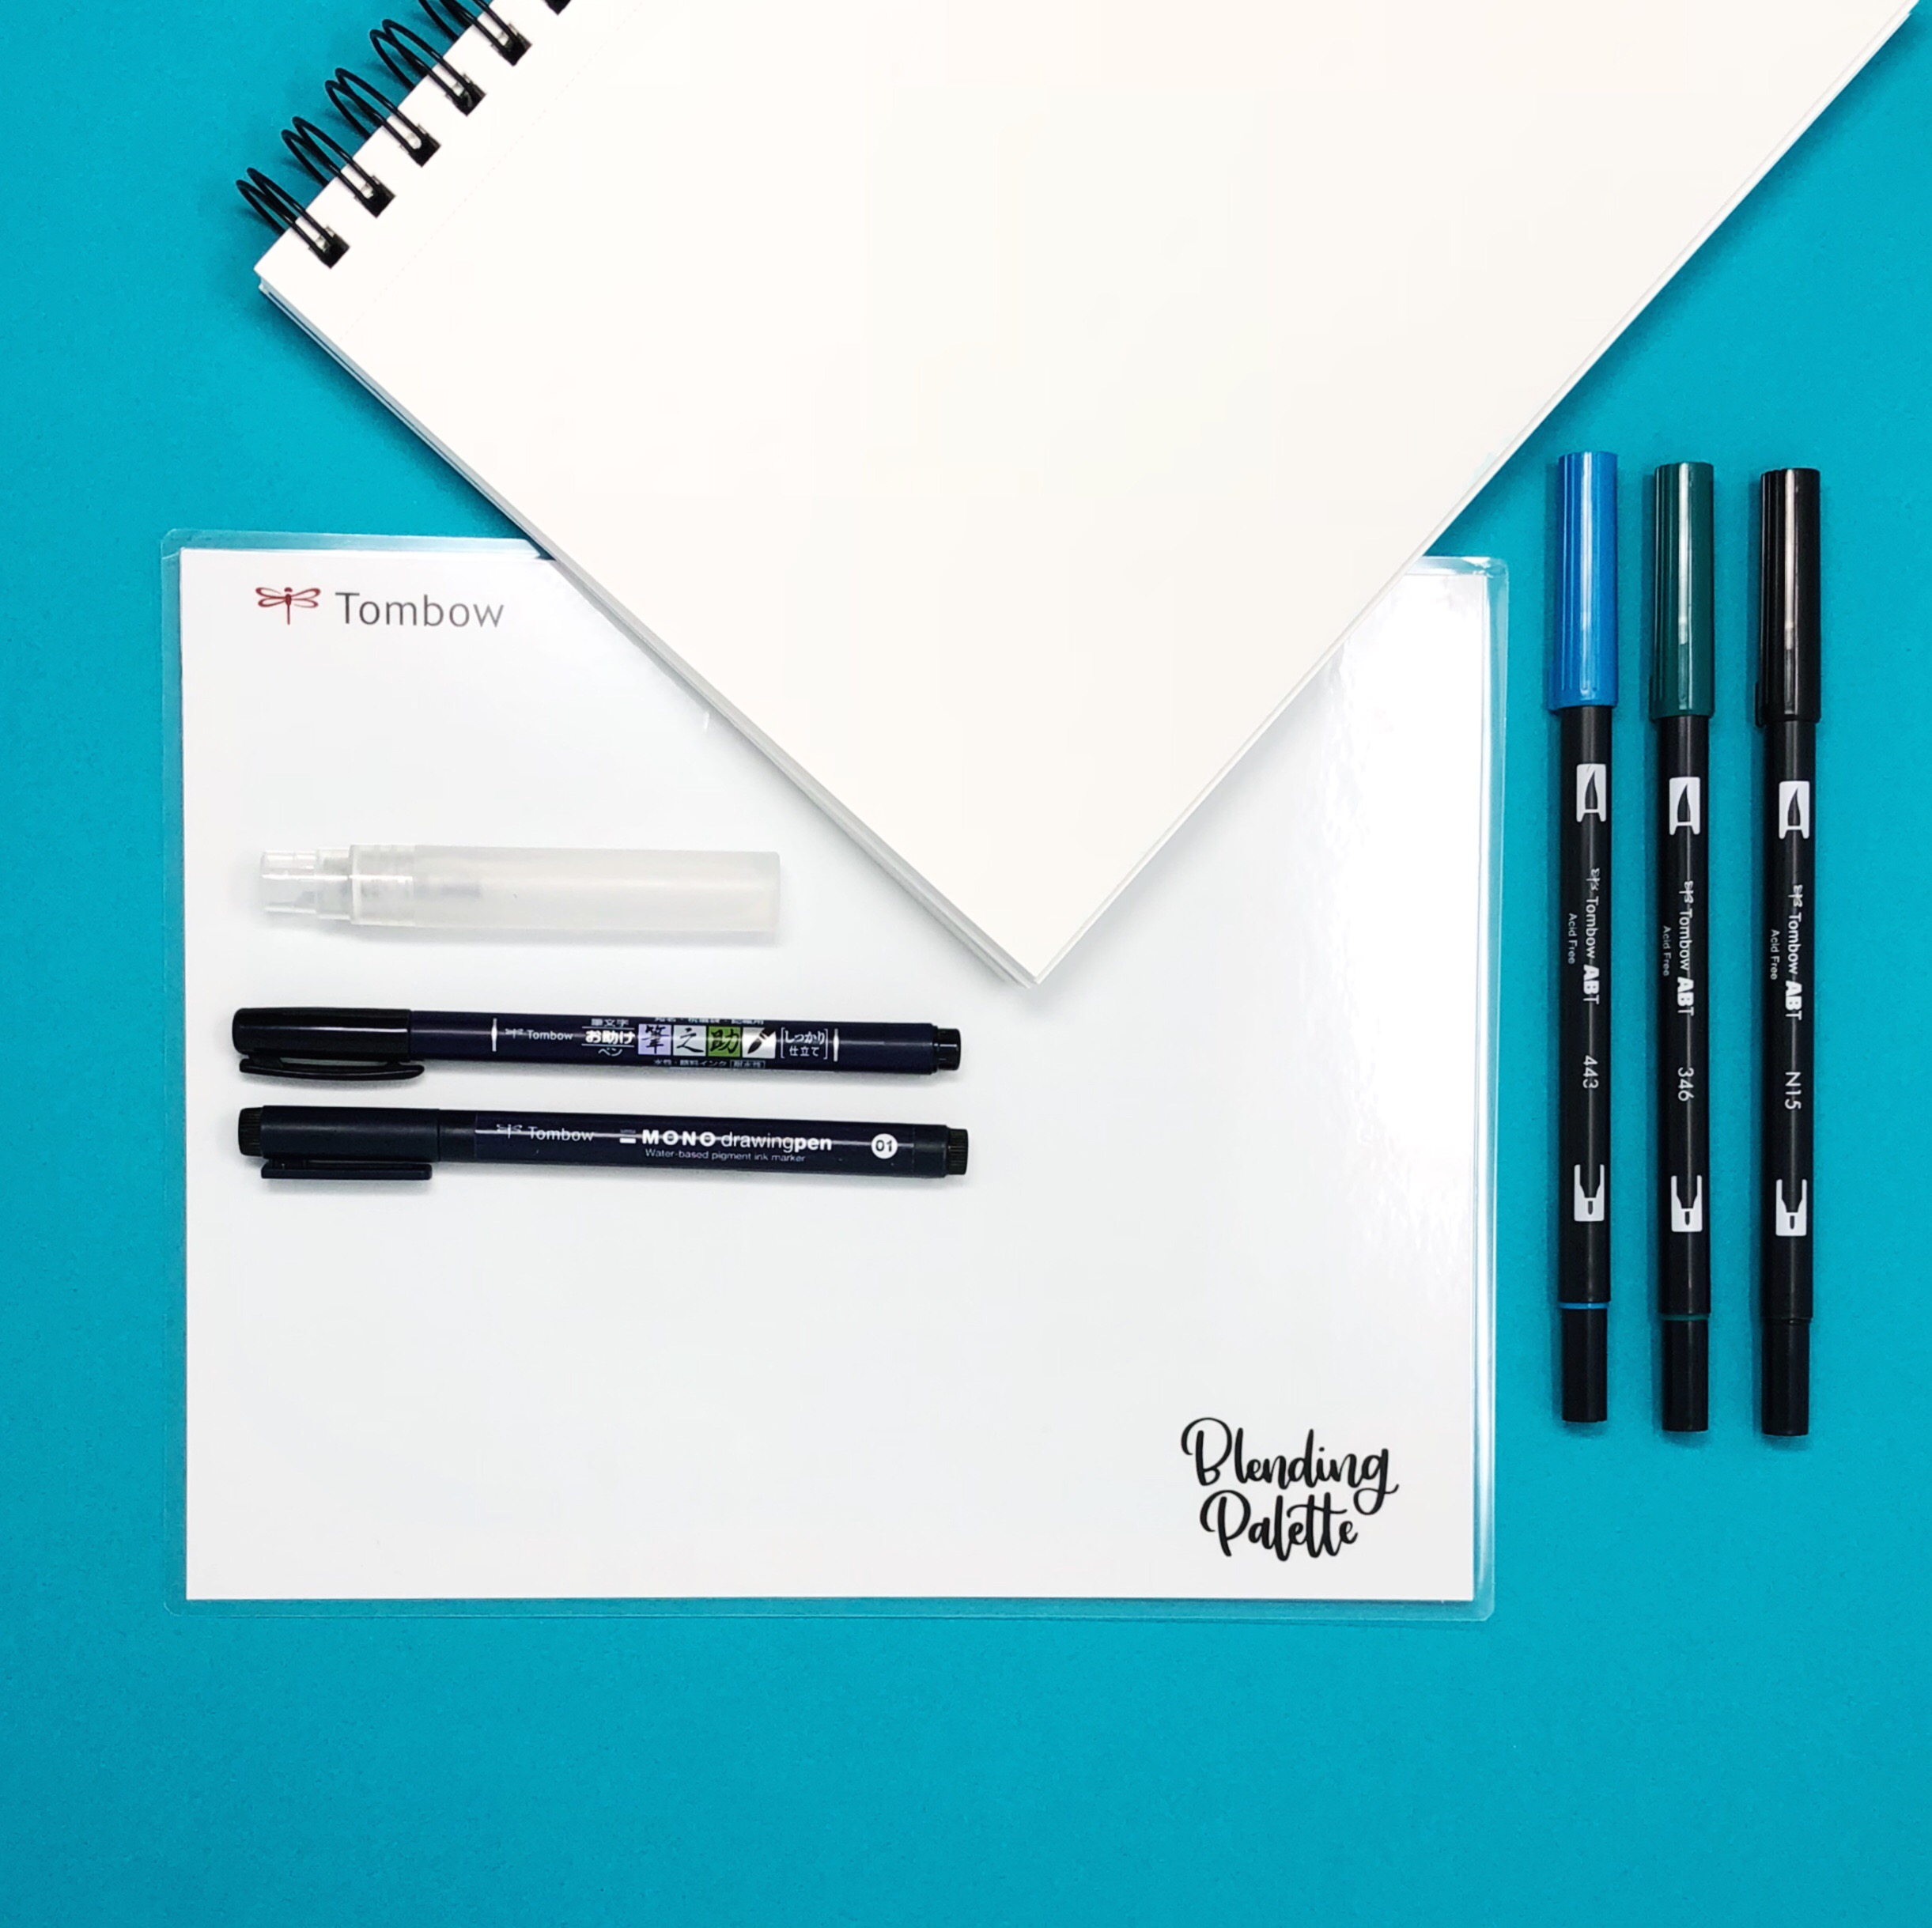
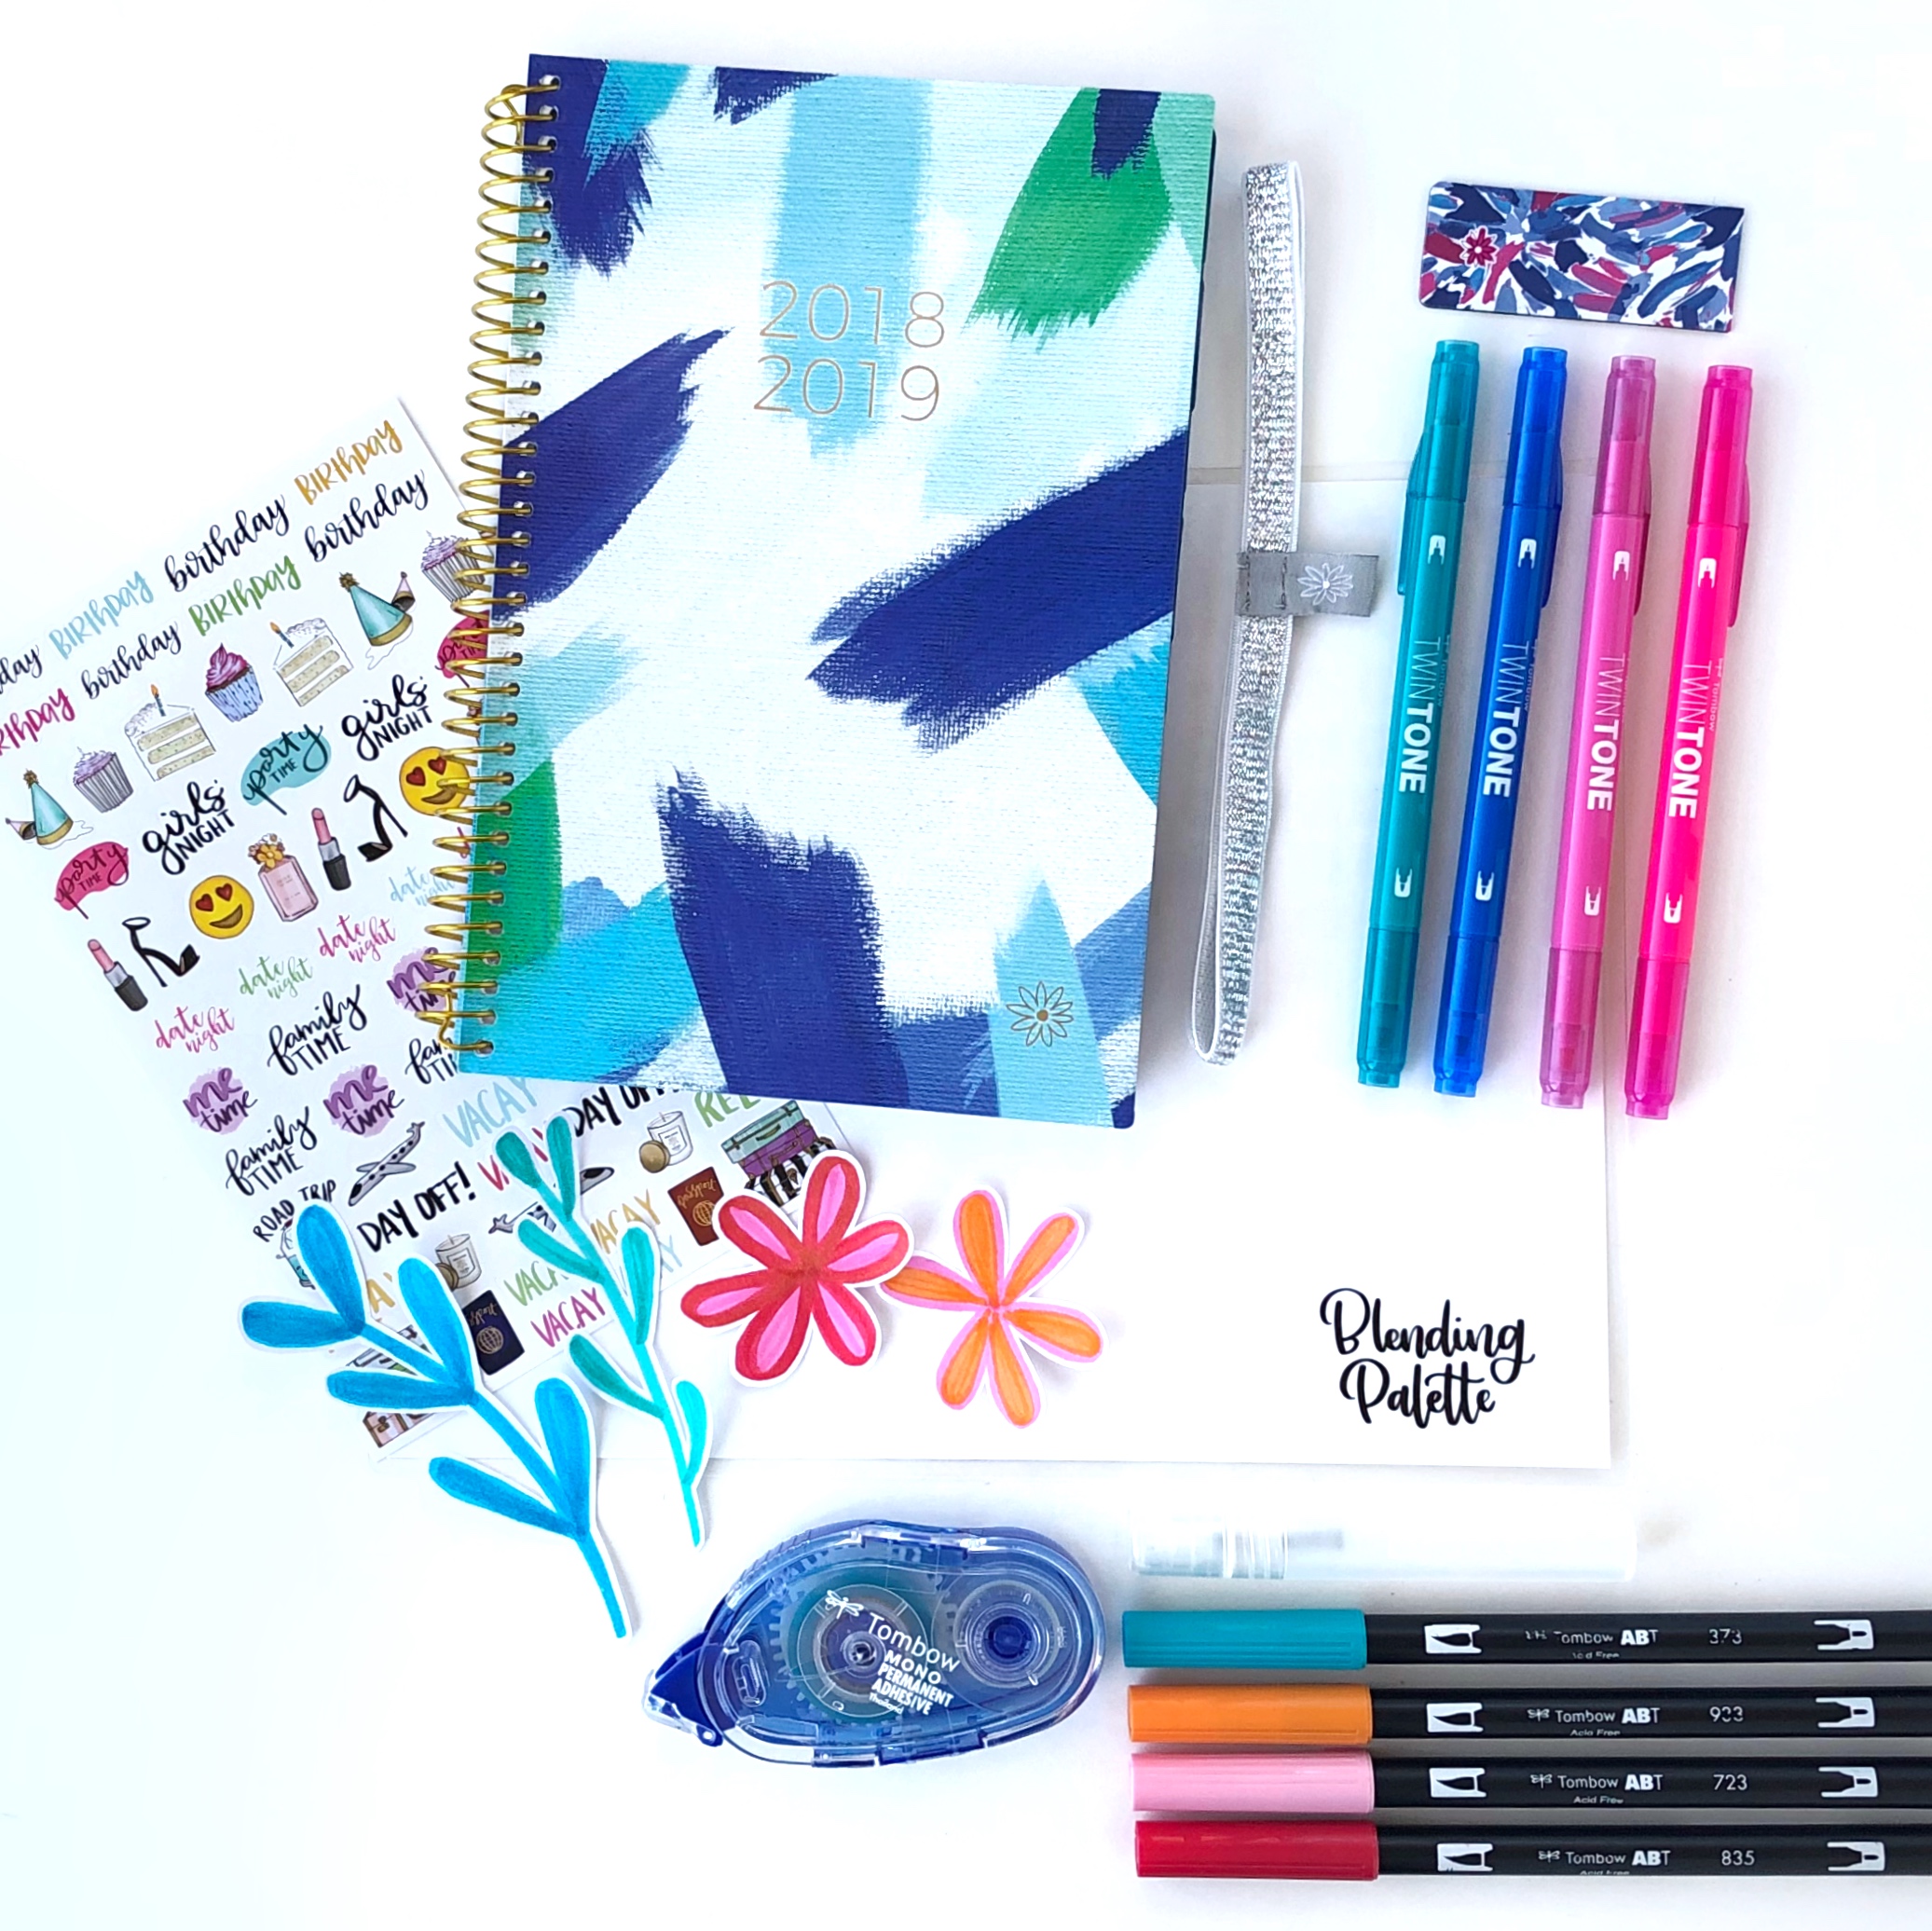
This week I wanted to show you how to use Tombow Dual Brush Pens to make some cute watercolor-look tags for your holiday gifts. You’ll need the following supplies to get started.

Supplies:

  • Dual Brush Pens

  • XL Blending Palette

  • Water Mister

  • Scissors

  • Watercolor paper or card

  • Hole punch

Watercolor Gift Tags by Jessica Mack of BrownPaperBunny

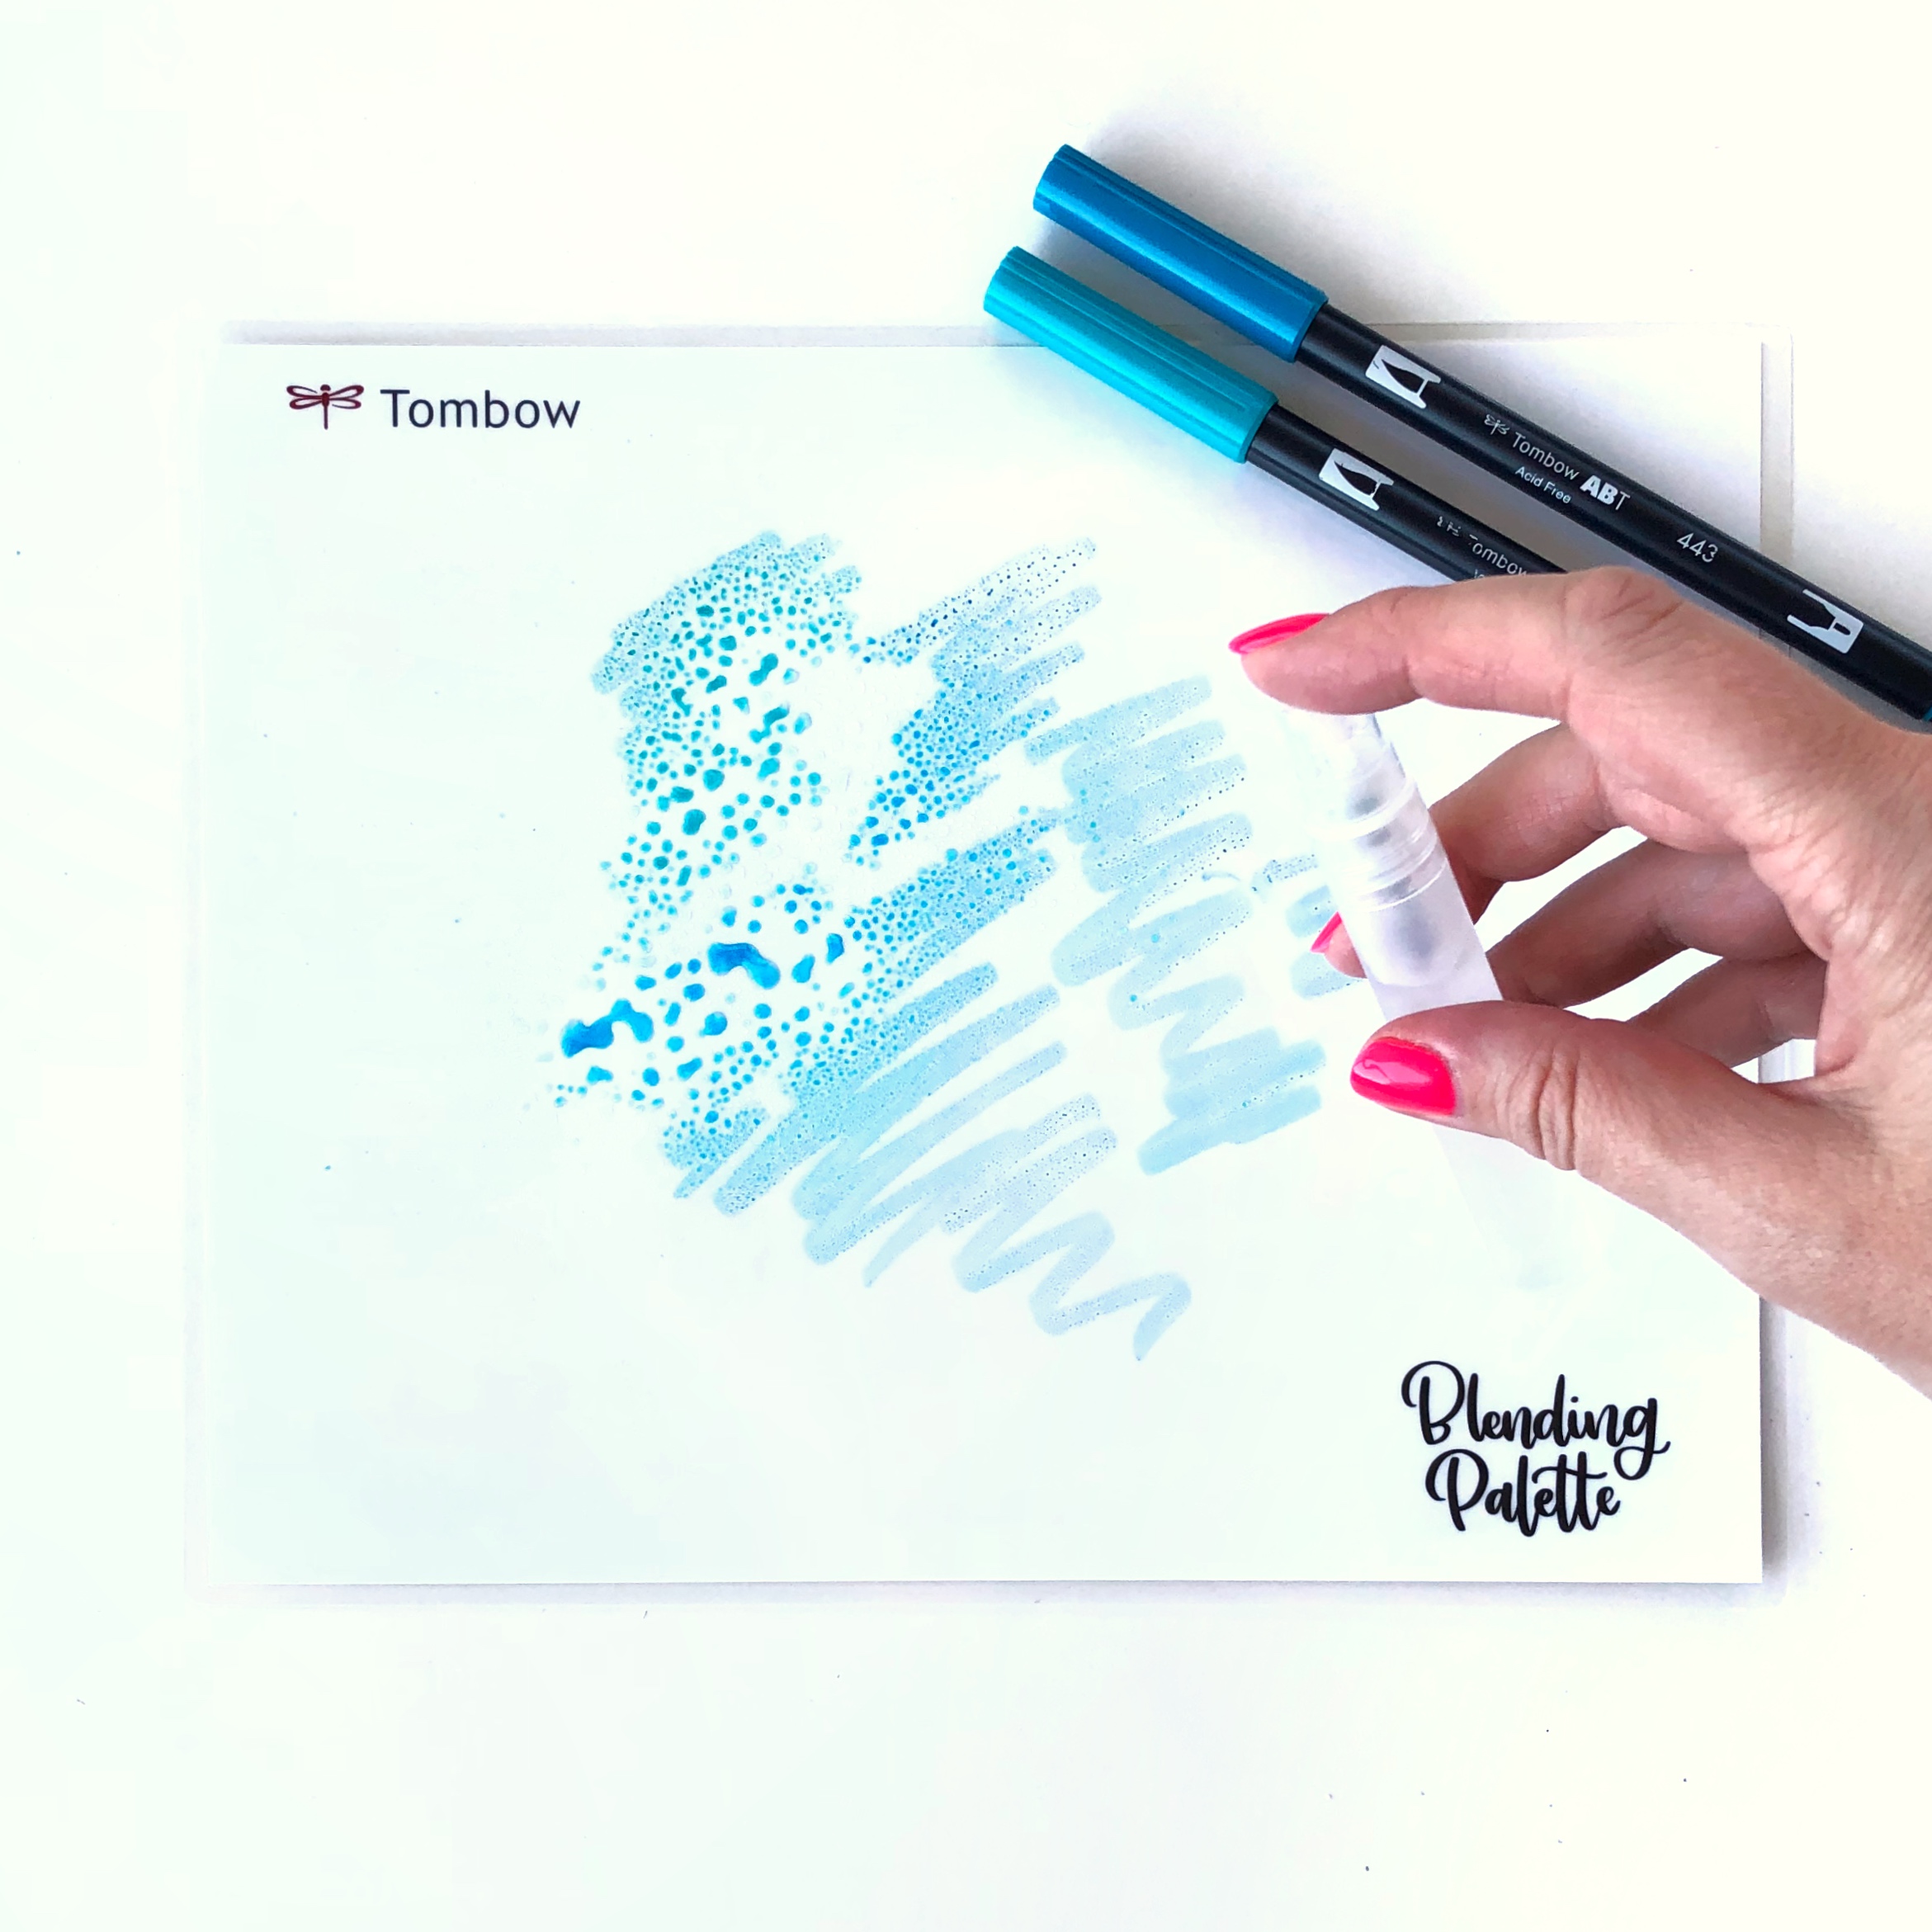
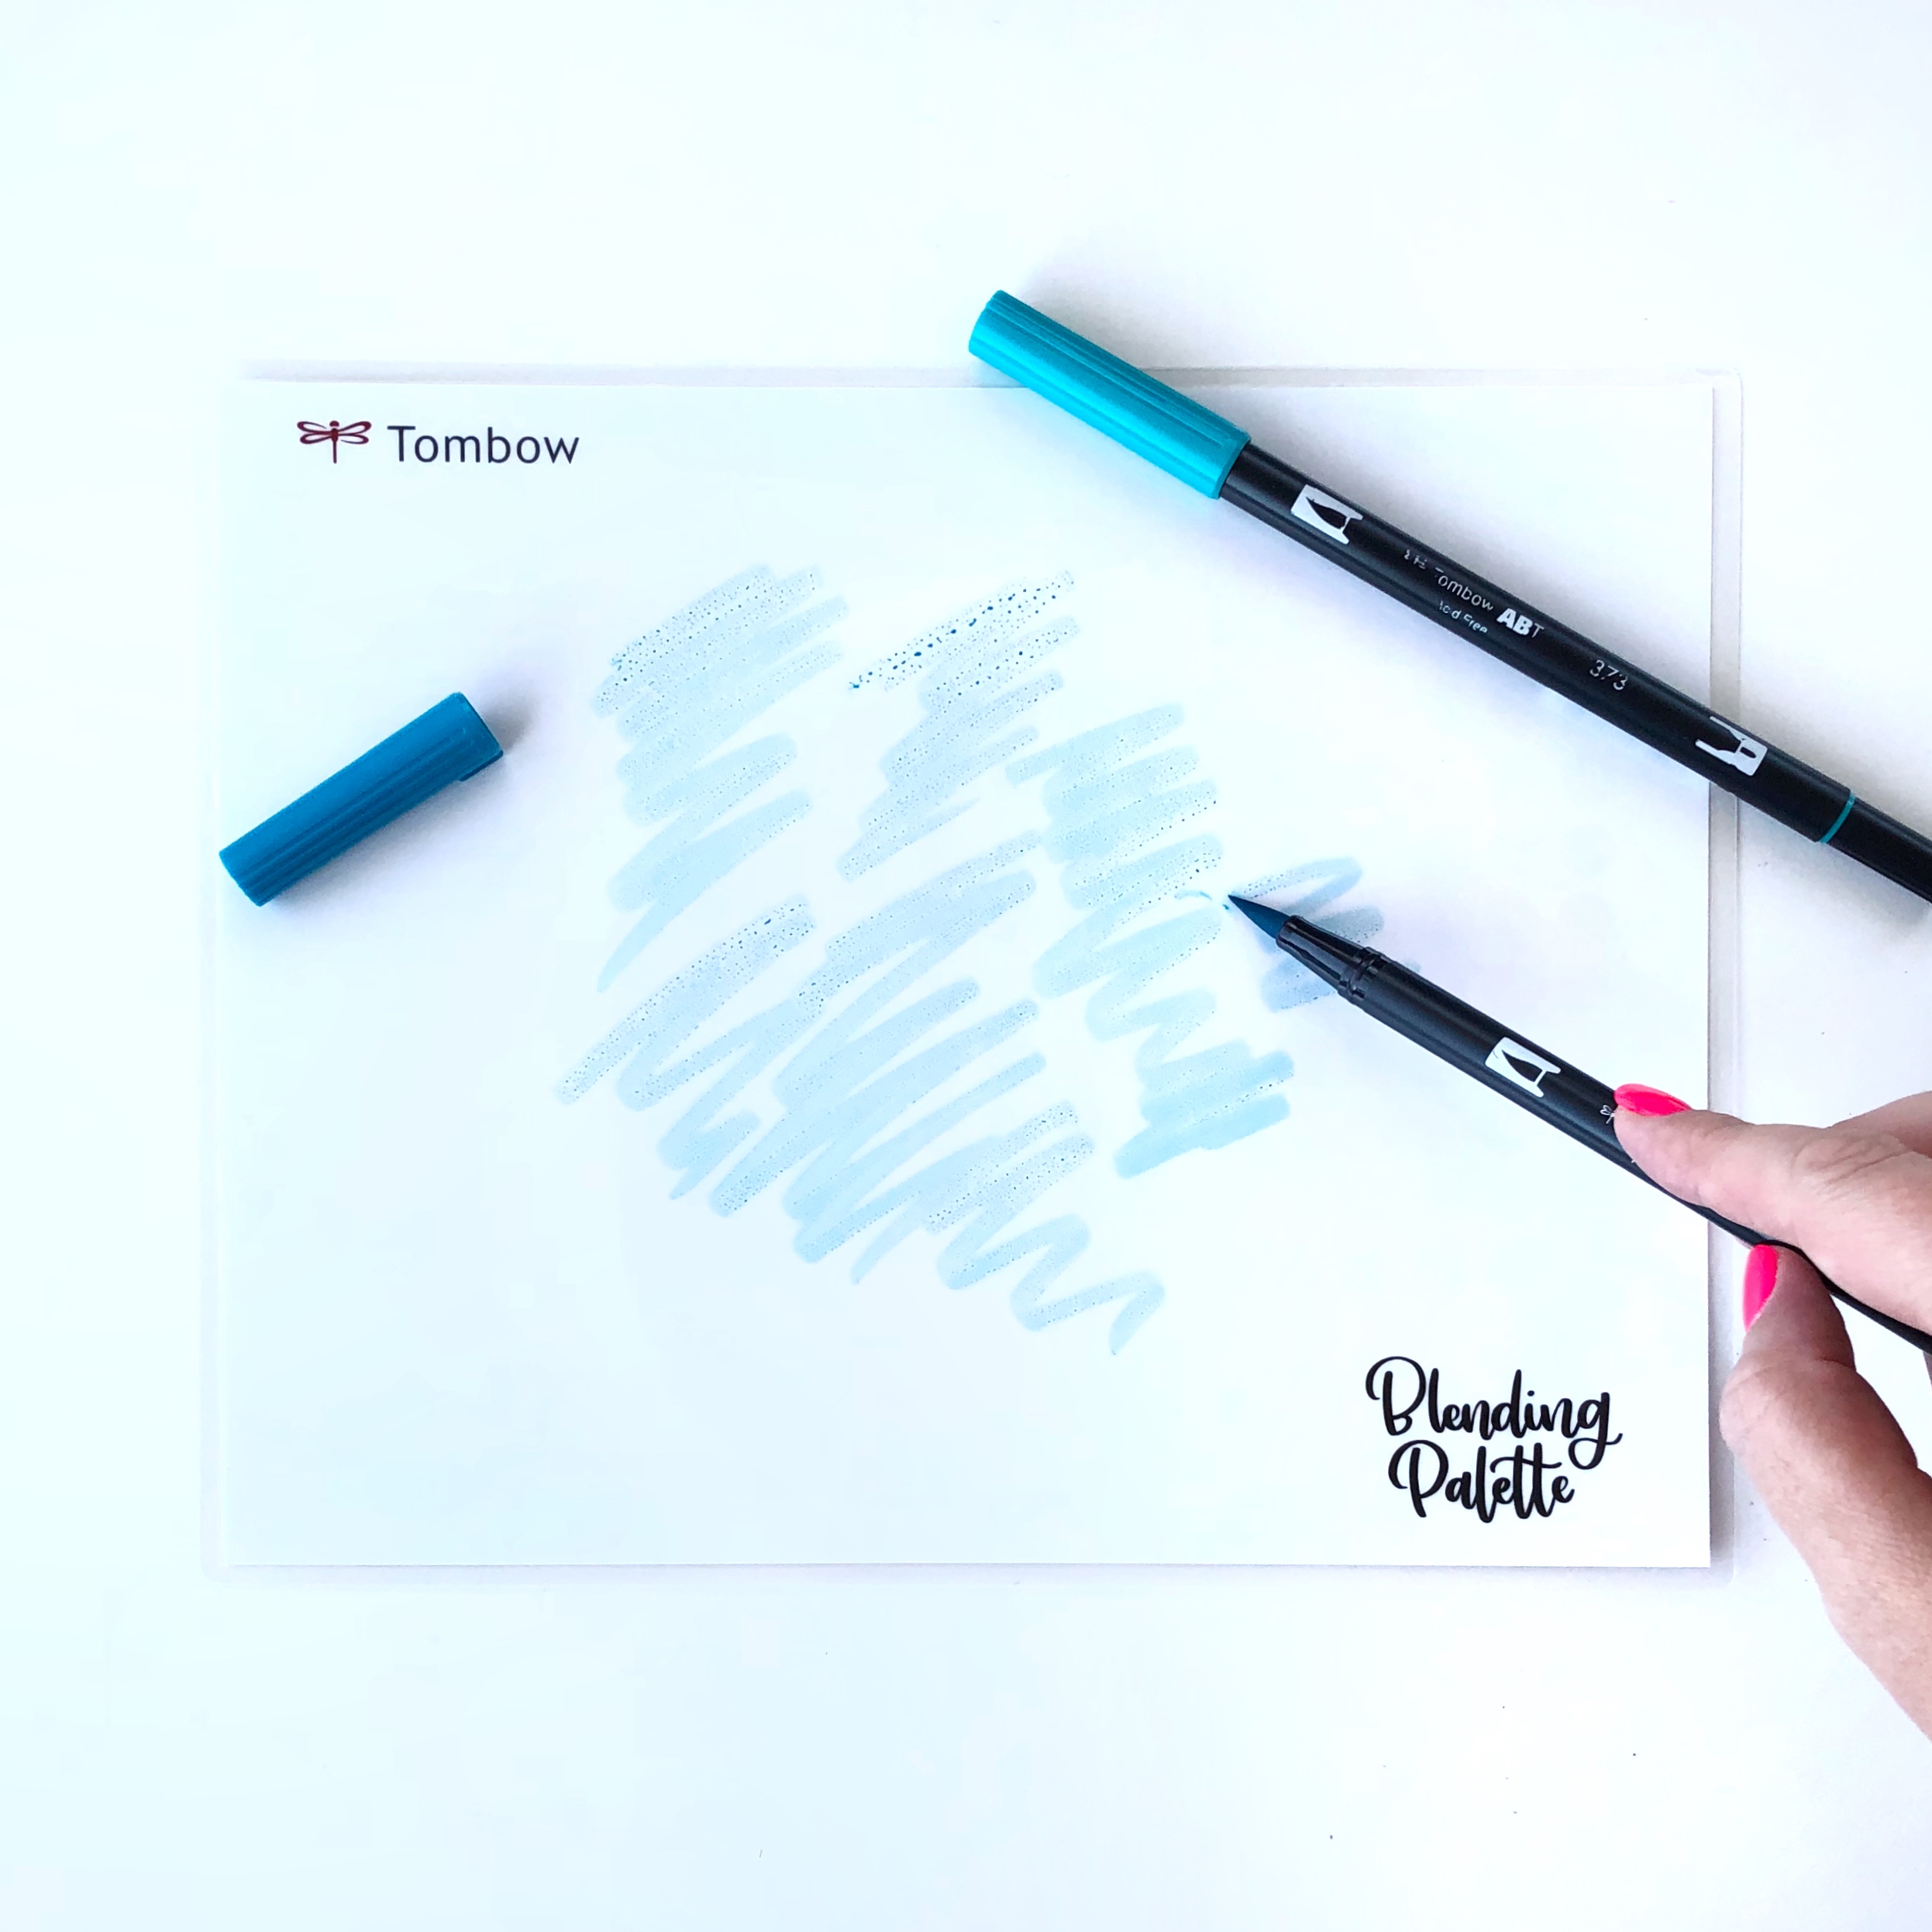
Step 1: Applying the Color

To make your watercolor-look gift tags, start by putting some ink down on your XL Blending Palette using your Dual Brush Pens. Try some different color combinations. Then spray the ink with water. Lay your watercolor paper or card on top and give it a good smush to make sure the ink blends.

Carefully lift the paper off and let it dry. Watch the video below to see the steps in action.


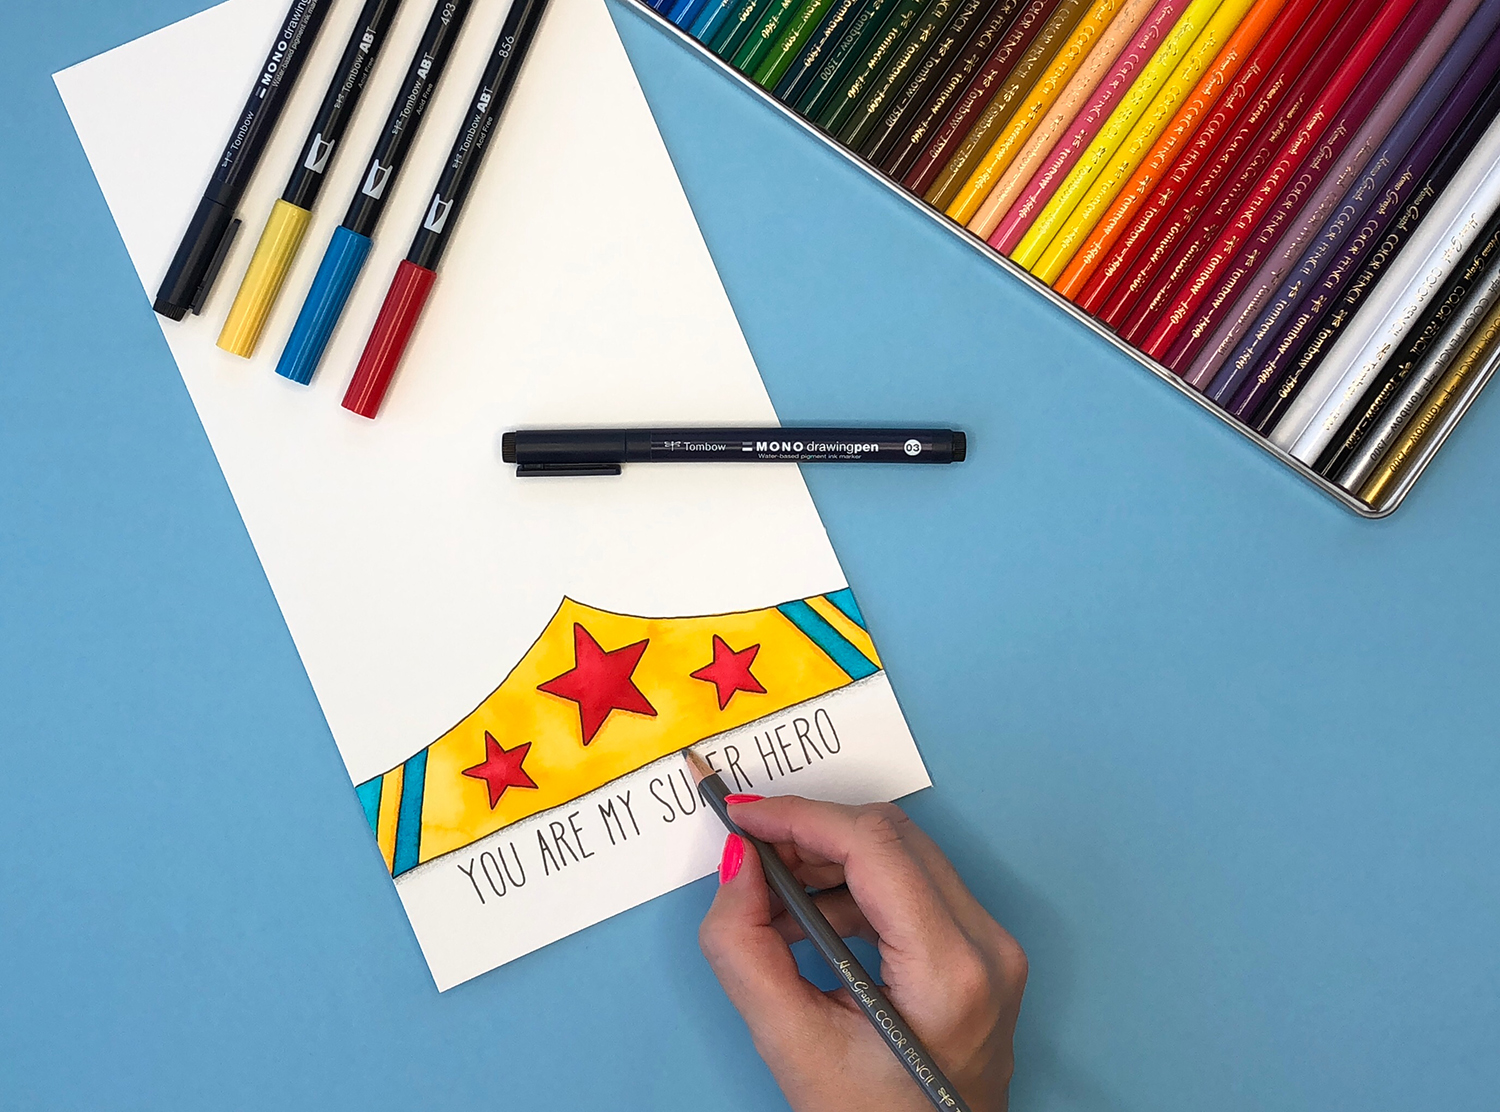
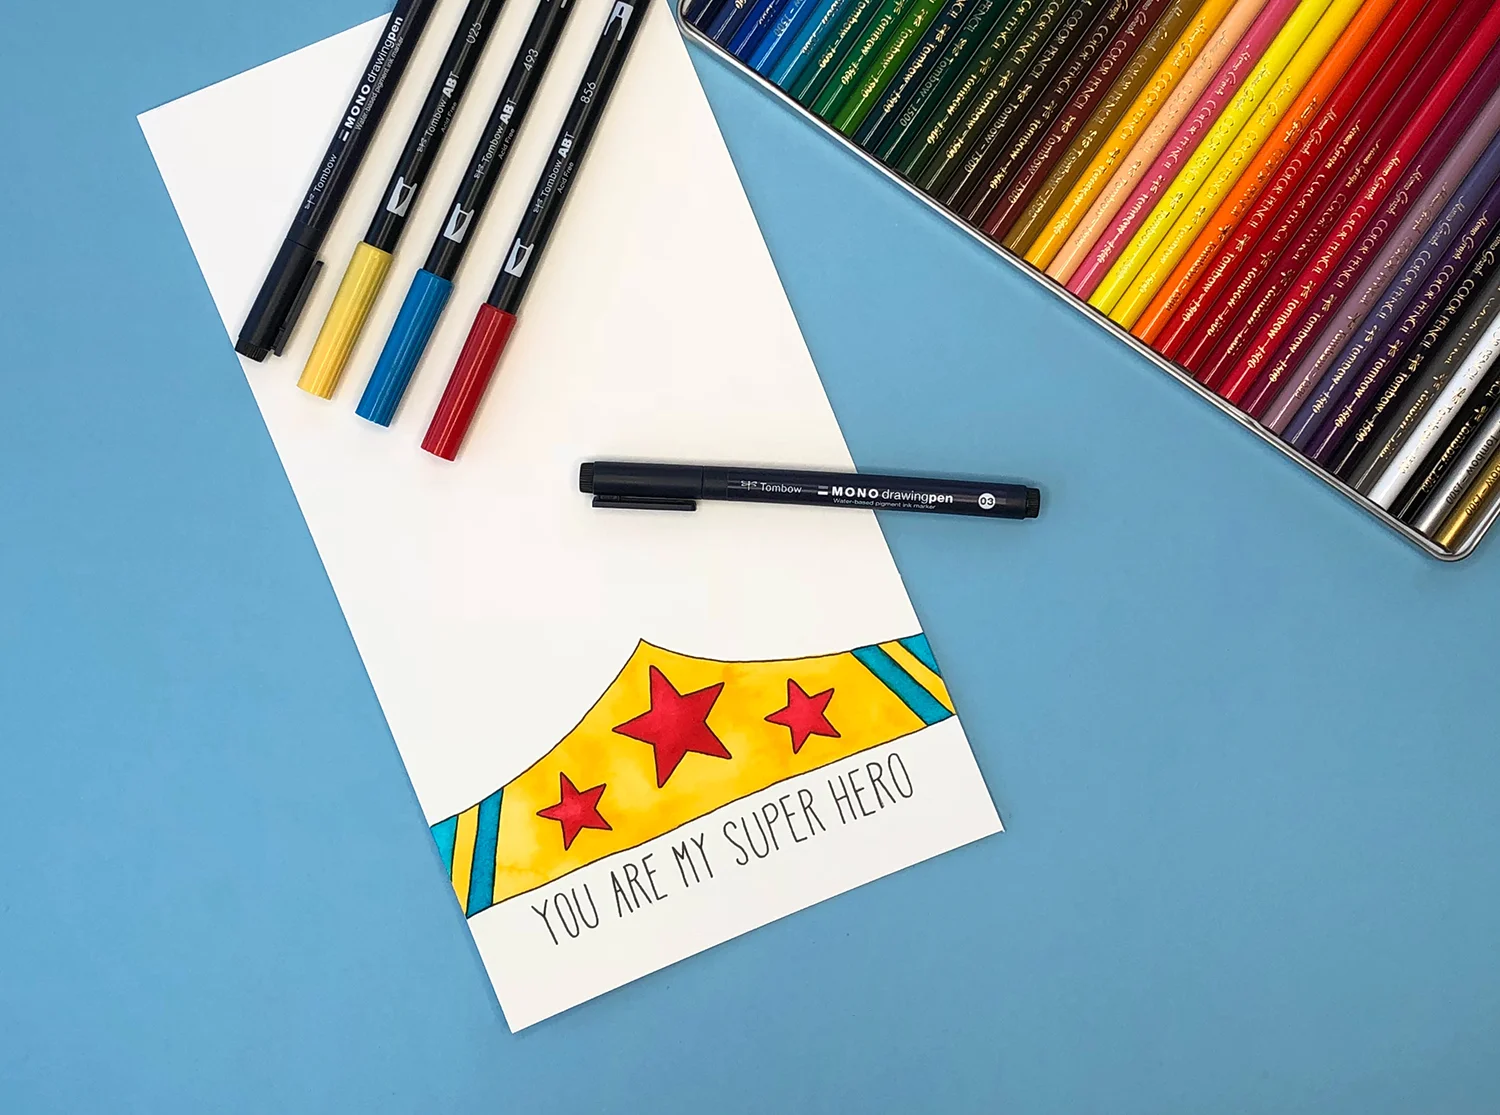
Step 2: Trace Your Tags

Using a light pencil, trace gift tag outlines onto the paper. I used a store-bought tag I had lying around.

Step 3: Cut Out Your Tags

Cut around each of your traced tags and voila, you’re ready to wrap!

You could get really creative with your color combinations, no need to stick to traditional holiday colors!

Do you have any gift-wrapping secrets? Share them with me in the comments!

In Ink, Tutorial, Aug 2017, Watercolor
8 Comments
Create Time-Lapse Videos of Your Art by Jessica Mack of BrownPaperBunny

New Skillshare Class: Create Time-Lapse Videos of Your Art

November 24, 2018

Hi friends!

I’ve spent the last few weeks preparing to launch my first ever Skillshare class, and it’s just gone live! If you’re not familiar with Skillshare, it is basically the Netflix of learning things…from painting to running a business.

My class is called ‘Create Time-Lapse Videos of Your Art’. I attribute so much of my business and social media growth to time-lapse videos of my art. While I don’t often get featured on Instagram’s discover feed with my still pictures, my videos get listed there all the time, meaning a lot more people can find me. I’ve also had so many paying jobs come my way via Instagram videos, so I’m excited to tech you how to make them too.

And, Skillshare will give you two months free Premium Membership if you follow this link. You can always cancel before the two months are up, if you decide it isn’t for you, but having been learning amazing things on Skillshare for years I bet you’ll get hooked!

I’d love to know what you think of my new class!

Check it Out
In Aug 2017, Fashion Illustration, Illustrations, Ink, Social Media Tips, Tutorial
2 Comments
Draw a Fall Wreath in Jewel Tones by Jessica Mack of BrownPaperBunny

Draw a Fall Wreath in Jewel Tones

November 16, 2018

Please note: This blog post contains affiliate links, which help pay for the upkeep of this site. That being said, I will never, ever promote anything I am not 100% in love with!

----------

Hello hello! Today I’m going to show you how to draw a fall wreath in jewel tones. While I love the colors of changing leaves at this time of year I thought it would be fun to branch out (pun intended) and try some brighter jewel tones that are a little less associated with fall. This wreath is super easy to draw and looks great on cards, your art journal, or in your planner. Here's what you'll need to get started.

Supplies:

  • Tombow Dual Brush Pens (I chose 312, 346, 528, 606, and 946)

  • Watercolor paper or thick paper or card

  • Tombow Mono Drawing Pencil (2H or 4H)

  • Paintbrush

  • Water

Draw a Fall Wreath in Jewel Tones by Jessica Mack of BrownPaperBunny

Step 1: Sketch Your Wreath in Pencil

The first step is to sketch out your wreath, using a pencil. I chose a 4H pencil because it is super light. You can sketch in some flowers, leaves, and fruit at this stage, or just draw the basic circle you plan to follow.

Step 2: Create a Soft First Layer

Next you're going to use your lighter colors to draw in some lose branch shapes around the wreath. These are going to end up being your background branches to add depth to your drawing.

Draw a Fall Wreath in Jewel Tones by Jessica Mack of BrownPaperBunny

Go over them with a wet paintbrush to soften them and blend the ink together a little.

Draw a Fall Wreath in Jewel Tones by Jessica Mack of BrownPaperBunny

Step 3: Add Your Largest Leaves and Shapes

Once your background branches are dry, it's time to start adding your larger shapes. These can be flowers, large leaves, fruit etc. If you want to have a watercolor-look you can use your wet paintbrush to go over these shapes as well, to blend your marker strokes together. To see how I do this, watch the time-lapse video at the end of this blog post. 

Draw a Fall Wreath in Jewel Tones by Jessica Mack of BrownPaperBunny

Step 4: Creating Details

Once everything is dry it's time to go back in and add more details. You can use the brush or the fine tip of your Dual Brush Pens to create more leaves, branches, add detail to your flowers etc.

Draw a Fall Wreath in Jewel Tones by Jessica Mack of BrownPaperBunny

Step 5: Lettering

The final step is to add some lettering to the middle of your wreath. You could simply write the word 'Fall' like I did, or add your favorite quote, someone's name, or a holiday greeting.

Draw a Fall Wreath in Jewel Tones by Jessica Mack of BrownPaperBunny

Watch the video below to see how this wreath all came together. And share your own wreath on social media! Tag @BrownPaperBunny so I can see!

In Watercolor, Illustrations, Aug 2017, Tutorial, Ink, Type
3 Comments
DIY Black and White Halloween Banner by Jessica Mack of BrownPaperBunny

DIY Black and White Halloween Banner

October 26, 2018

Please note: This blog post contains affiliate links, which help pay for the upkeep of this site. That being said, I will never, ever promote anything I am not 100% in love with!

----------

This week I’m going to show you how to make this chic DIY black and white Halloween banner. It's easy to make, looks great, and you'll only need a few supplies to get started.

Supplies:

  • Tombow Dual Brush Pen (Black N15)

  • Card or thick paper

  • Tombow Mono Drawing Pens

  • Black or white ribbon or string

  • Tombow Adhesive Permanent

  • Scissors

DIY Black and White Halloween Banner by Jessica Mack of BrownPaperBunny

Step 1: Cut Out Your Pennants

The first step is to cut out the pennants for your banner. An easy way to choose the size of your pennants is to divide the card in half horizontally then see how many you can fit into each half, with one side made up of triangles and the other side dovetail shapes. You'll fit twice the triangles by having every second one upside down. Leave a strip at the top of each pennant to fold over the ribbon. Once you have your first set of shapes cut out you can use them as a template for the rest.

Step 2: Create Your Designs

Once all your pennant shapes are cut out you are ready to draw your Halloween designs using Mono Drawing Pens and your black Dual Brush Pen. I made mine a little less scary to avoid giving my daughter nightmares but you can make yours as kid-friendly or as spooky as you like. Think about drawing ghosts, ghouls, haunted houses, witch silhouettes, spiders, bats, webs or jack-o-lanterns. Feel free to alternate simple patterns in between the Halloween motifs.

DIY Black and White Halloween Banner by Jessica Mack of BrownPaperBunny

Step 3: Stick The Pennants to the Ribbon

Once all your pennants are completed it's time to stick them to the ribbon or string. To make sure they are secure fold the top of the card over the ribbon and use your adhesive to stick the folded flap to the back of the pennant. To ensure a strong bond it helps to place the folded section under a heavy book for a few minutes. Continue until all of your pennants are fixed to the ribbon, then you're ready to hang it. It looks great above a fireplace, in a doorway, or a window.

DIY Black and White Halloween Banner by Jessica Mack of BrownPaperBunny

Show me your DIY black and white Halloween banner on social media. Tag @BrownPaperBunny so I can see your handiwork!

In Ink, Aug 2017, Tutorial
7 Comments
Clara McSweeney in Marchesa in PaperFashion's Studio Garden. Photo by Jessica Mack of BrownPaperBunny

Degas Dream

October 21, 2018

Recently I spent the weekend in New York at Katie Rodger’s (PaperFashion) studio, in what felt like a Degas dream. We spent our time sketching ballerinas and runway models and learning how to use pastels with the incredibly talented Andy Espinoza. In the mornings and evenings I explored New York City, wandering through the MET, Central Park, or the Village (and eating way too much delicious food).

I came away from the weekend feeling inspired beyond words, so I wanted to share a few photos with you. You can find more photos and videos in my Instagram stories here.

Have you ever gone on an art retreat or taken a class that you just didn’t want to end?

  Katie’s  studio is such an inspirational and colorful place to work

Katie’s studio is such an inspirational and colorful place to work

 Underpainting for my Marchesa piece.

Underpainting for my Marchesa piece.

 Working on a Marchesa piece in pastel

Working on a Marchesa piece in pastel

  Katie ’s studio garden is a magical urban oasis

Katie’s studio garden is a magical urban oasis

 The extremely talented  @CateHurlin  and  @Erica_Llall

The extremely talented @CateHurlin and @Erica_Llall

 Exploring the way pastels interact with water

Exploring the way pastels interact with water

 The extremely talented  @CateHurlin  and  @Erica_Llall

The extremely talented @CateHurlin and @Erica_Llall

  Katie’s  studio is such an inspirational and colorful place to work

Katie’s studio is such an inspirational and colorful place to work

 The extremely talented  @CateHurlin  and  @Erica_Llall

The extremely talented @CateHurlin and @Erica_Llall

 The extremely talented  @CateHurlin  and  @Erica_Llall

The extremely talented @CateHurlin and @Erica_Llall

 This is the only time you’ll ever see me take a bathroom mirror selfie. ;)

This is the only time you’ll ever see me take a bathroom mirror selfie. ;)

  Katie’s  studio is such an inspirational and colorful place to work

Katie’s studio is such an inspirational and colorful place to work

IMG_9078.jpg
IMG_9110.jpg
IMG_9121.jpg
 Wonderful weekend work from  @Bonnieschen

Wonderful weekend work from @Bonnieschen

IMG_9126 2.jpg
 The impossibly tall and gorgeous  Clara McSweeny , wearing a stunning  Marchesa  gown.

The impossibly tall and gorgeous Clara McSweeny, wearing a stunning Marchesa gown.

 The impossibly tall and gorgeous  Clara McSweeny , wearing a stunning  Marchesa  gown.

The impossibly tall and gorgeous Clara McSweeny, wearing a stunning Marchesa gown.

  Katie’s  studio is such an inspirational and colorful place to work

Katie’s studio is such an inspirational and colorful place to work

IMG_9049.jpg
  Andy Espinoza ’s amazing artwork

Andy Espinoza’s amazing artwork

 The impossibly tall and gorgeous  Clara McSweeny , wearing a stunning  Marchesa  gown.

The impossibly tall and gorgeous Clara McSweeny, wearing a stunning Marchesa gown.

 The impossibly tall and gorgeous  Clara McSweeny , wearing a stunning  Marchesa  gown.

The impossibly tall and gorgeous Clara McSweeny, wearing a stunning Marchesa gown.

IMG_8880.jpg
 The impossibly tall and gorgeous  Clara McSweeny , wearing a stunning  Marchesa  gown.

The impossibly tall and gorgeous Clara McSweeny, wearing a stunning Marchesa gown.

 The impossibly tall and gorgeous  Clara McSweeny , wearing a stunning  Marchesa  gown.

The impossibly tall and gorgeous Clara McSweeny, wearing a stunning Marchesa gown.

 The impossibly tall and gorgeous  Clara McSweeny , wearing a stunning  Marchesa  gown.

The impossibly tall and gorgeous Clara McSweeny, wearing a stunning Marchesa gown.

IMG_8739.jpg
IMG_8741.jpg
  Katie’s  studio is such an inspirational and colorful place to work

Katie’s studio is such an inspirational and colorful place to work

  Katie’s  studio is such an inspirational and colorful place to work

Katie’s studio is such an inspirational and colorful place to work

 Katie’s studio garden is a magical urban oasis

Katie’s studio garden is a magical urban oasis

  Katie’s  studio is such an inspirational and colorful place to work

Katie’s studio is such an inspirational and colorful place to work

IMG_8757.jpg
 Stage one of my pastel portrait

Stage one of my pastel portrait

IMG_8716.jpg
 Katie’s studio garden is a magical urban oasis

Katie’s studio garden is a magical urban oasis

  Andy Espinoza ’s amazing artwork

Andy Espinoza’s amazing artwork

  Andy Espinoza ’s amazing artwork

Andy Espinoza’s amazing artwork

  Andy Espinoza ’s amazing artwork

Andy Espinoza’s amazing artwork

  Andy Espinoza ’s amazing artwork

Andy Espinoza’s amazing artwork

IMG_9081.jpg
IMG_9085.jpg
IMG_9087.jpg
IMG_9094.jpg
  Katie’s  studio is such an inspirational and colorful place to work

Katie’s studio is such an inspirational and colorful place to work

  Katie’s  studio is such an inspirational and colorful place to work

Katie’s studio is such an inspirational and colorful place to work

 The impossibly tall and gorgeous  Clara McSweeny , wearing a stunning  Marchesa  gown.

The impossibly tall and gorgeous Clara McSweeny, wearing a stunning Marchesa gown.

 The impossibly tall and gorgeous  Clara McSweeny , wearing a stunning  Marchesa  gown.

The impossibly tall and gorgeous Clara McSweeny, wearing a stunning Marchesa gown.

 My first drawing of  Clara McSweeny , wearing   Marchesa , done in pastel and graphite.

My first drawing of Clara McSweeny, wearing Marchesa, done in pastel and graphite.

 The impossibly tall and gorgeous  Clara McSweeny , wearing a stunning  Marchesa  gown.

The impossibly tall and gorgeous Clara McSweeny, wearing a stunning Marchesa gown.

  Katie’s  studio is such an inspirational and colorful place to work

Katie’s studio is such an inspirational and colorful place to work

FullSizeRender.jpg
IMG_9169.jpg
IMG_9126.jpg
  Katie  and I

Katie and I

 I want to live in Katie’s little garden!

I want to live in Katie’s little garden!

  Andy  and I

Andy and I

  Katie’s  studio is such an inspirational and colorful place to work  Underpainting for my Marchesa piece.  Working on a Marchesa piece in pastel   Katie ’s studio garden is a magical urban oasis  The extremely talented  @CateHurlin  and  @Erica_Llall   Exploring the way pastels interact with water  The extremely talented  @CateHurlin  and  @Erica_Llall    Katie’s  studio is such an inspirational and colorful place to work  The extremely talented  @CateHurlin  and  @Erica_Llall   The extremely talented  @CateHurlin  and  @Erica_Llall   This is the only time you’ll ever see me take a bathroom mirror selfie. ;)    Katie’s  studio is such an inspirational and colorful place to work IMG_9078.jpg IMG_9110.jpg IMG_9121.jpg  Wonderful weekend work from  @Bonnieschen  IMG_9126 2.jpg  The impossibly tall and gorgeous  Clara McSweeny , wearing a stunning  Marchesa  gown.   The impossibly tall and gorgeous  Clara McSweeny , wearing a stunning  Marchesa  gown.   Katie’s  studio is such an inspirational and colorful place to work IMG_9049.jpg   Andy Espinoza ’s amazing artwork  The impossibly tall and gorgeous  Clara McSweeny , wearing a stunning  Marchesa  gown.  The impossibly tall and gorgeous  Clara McSweeny , wearing a stunning  Marchesa  gown. IMG_8880.jpg  The impossibly tall and gorgeous  Clara McSweeny , wearing a stunning  Marchesa  gown.  The impossibly tall and gorgeous  Clara McSweeny , wearing a stunning  Marchesa  gown.  The impossibly tall and gorgeous  Clara McSweeny , wearing a stunning  Marchesa  gown. IMG_8739.jpg IMG_8741.jpg   Katie’s  studio is such an inspirational and colorful place to work   Katie’s  studio is such an inspirational and colorful place to work  Katie’s studio garden is a magical urban oasis   Katie’s  studio is such an inspirational and colorful place to work IMG_8757.jpg  Stage one of my pastel portrait IMG_8716.jpg  Katie’s studio garden is a magical urban oasis   Andy Espinoza ’s amazing artwork   Andy Espinoza ’s amazing artwork   Andy Espinoza ’s amazing artwork   Andy Espinoza ’s amazing artwork IMG_9081.jpg IMG_9085.jpg IMG_9087.jpg IMG_9094.jpg   Katie’s  studio is such an inspirational and colorful place to work   Katie’s  studio is such an inspirational and colorful place to work  The impossibly tall and gorgeous  Clara McSweeny , wearing a stunning  Marchesa  gown.  The impossibly tall and gorgeous  Clara McSweeny , wearing a stunning  Marchesa  gown.  My first drawing of  Clara McSweeny , wearing   Marchesa , done in pastel and graphite.  The impossibly tall and gorgeous  Clara McSweeny , wearing a stunning  Marchesa  gown.   Katie’s  studio is such an inspirational and colorful place to work FullSizeRender.jpg IMG_9169.jpg IMG_9126.jpg   Katie  and I  I want to live in Katie’s little garden!   Andy  and I

Many thanks to Andy Espinoza, Katie Rodgers, Marchesa, Clara McSweeney, Erica Llal, and Cate Hurlin for creating such a memorable weekend!

In Aug 2017, Fashion Illustration, Illustrations
3 Comments
DIY Happy Mail with Mixbook and Tombow by Jessica Mack of BrownPaperBunny

DIY Happy Mail with Mixbook and Tombow

October 19, 2018

Please note: This blog post contains affiliate links, which help pay for the upkeep of this site. That being said, I will never, ever promote anything I am not 100% in love with!

----------

Hello hello! This week I’m going to show you how to make some fun travel-themed happy mail with Mixbook and Tombow supplies. I think the world would be a happier place in general if we all sent a little more snail mail to each other!

Supplies:

  • Tombow Fudenosuke Color Brush Pens

  • Mixbook Invitation Cards

  • Tombow Mono Drawing Pen

  • Map or travel photo

  • Tombow Mono Adhesive + Permanent

  • Plain paper

  • Scissors

DIY Happy Mail with Mixbook and Tombow by Jessica Mack of BrownPaperBunny

Step 1: Write Your Greeting

Use your colored Fudenosuke brush pens to write your greeting onto a separate piece of paper. Have some fun with the colors and try some different writing styles!

DIY Happy Mail with Mixbook and Tombow by Jessica Mack of BrownPaperBunny

Step 2: Cut Everything Out

Cut out your greeting, and trim down your map or travel photos so they fit just inside the border of your Mixbook invitation cards.

Step 3: Stick the Pieces Together

Using your Mono Permanent + Adhesive stick your map or photos to the card, then layer your greeting on top. Use your Fudenosuke brush pens to add some fun details or finishing touches then write on the back with your Mono Drawing Pen and your DIY Mixboook happy mail is ready to be sent!

DIY Happy Mail with Mixbook and Tombow by Jessica Mack of BrownPaperBunny

To put a little extra sparkle in your recipient's day why not decorate the envelope as well. Use your Fudenosuke or Mono Drawing Pens to continue the travel theme on the outside.

I’d love to see your happy mail, tag @BrownPaperBunny on social media so I can take a look!

In Tutorial, Type, Ink, Aug 2017
2 Comments
Make a Folding Halloween Card with Jessica Mack of BrownPaperBunny

Make a Folding Halloween Card

October 12, 2018

Please note: This blog post contains affiliate links, which help pay for the upkeep of this site. That being said, I will never, ever promote anything I am not 100% in love with!

----------

This week I’m going to show you how to make this cute folding Halloween card, perfect for sending to the grandparents! To start, gather your supplies and then read through the steps below!

Supplies:

  • Scary Harry Halloween paper from PopFizz Paper

  • Tombow Dual Brush Pens

  • Card or watercolor paper

  • Tombow Mono Permanent Adhesive

  • Scissors

  • Photos 

Make a Folding Halloween Card with Jessica Mack of BrownPaperBunny

Step 1: Cut Everything Out

First, cut out your photos and decorative elements like spiders, pumpkins, and lightning bolts. Next, glue your strips of card together to make one long strip, and fold it into even sections, working backward and forwards so you get a concertina effect. Color your card using Dual Brush Pens, leave it white or use card that is already colored. 

Make a Folding Halloween Card with Jessica Mack of BrownPaperBunny

Step 2: Stick Everything Down

Move your cut-out elements around until you're happy with the placement of them, then use your Mono Adhesive Permanent roller to stick everything to the card backing. Add on some decorative elements, maybe a spider or two, a hat, or wand. Create a few finishing touches with your Dual Brush Pen and you're ready to send your cute, folding Halloween card!

Make a Folding Halloween Card with Jessica Mack of BrownPaperBunny

I’d love to see your finished card, tag @BrownPaperBunny on social media! And let me know in the comments if you dress up for Halloween!

In Tutorial, Aug 2017
9 Comments
How to Draw a Witch by Jessica Mack of BrownPaperBunny

How to Draw a Witch

October 1, 2018

Please note: This blog post contains affiliate links, which help pay for the upkeep of this site. That being said, I will never, ever promote anything I am not 100% in love with!

----------

I hate when people tell themselves that they can’t draw. I hear it WAY too often!

So I’m here to tell you that it’s really just breaking objects down into shapes and lines, and today I’m going to show you how to draw a cute little witch so you can make your own Halloween cards!

Here’s what you’ll need to get started.

Supplies:

  • Tombow Dual Brush Pens

  • Scissors

  • Thick card or watercolor paper (I’m using Strathmore Bristol)

How to Draw a Witch by Jessica Mack of BrownPaperBunny

Step 1: Draw Your Shapes

To draw your cute little witch start with a circle for her head, a Hershey's Kiss shaped body, and little sausage-shaped arms and legs.

Draw a line for the broomstick and a rounded rectangle for the broom bristles.

Step 2: Add Details

Once you’re happy with the basic shapes starting adding some details. Give her a face, hair and clothes.

How to Draw a Witch by Jessica Mack of BrownPaperBunny

Step 3: Add Color

The last step is to color your cute little witch, using your Dual Brush Pens. Add a darker shade anywhere there might be a shadow (under her arm, the brim of her hat etc). Once the ink is dry, cut her out and you’ve got a fun Halloween card! For an extra special touch make your own matching envelopes.

How to Draw a Witch by Jessica Mack of BrownPaperBunny

If you make some of your own I’d love to see! Tag @BrownPaperBunny on social media.

In Ink, Aug 2017, Tutorial
6 Comments
Make a Halloween Candy Card with Jessica Mack of BrownPaperBunny

Make a Halloween Candy Card

September 28, 2018

Please note: This blog post contains affiliate links, which help pay for the upkeep of this site. That being said, I will never, ever promote anything I am not 100% in love with!

----------

Today I’m going to show you how to make these deliciously simple Halloween candy cards. These tasty greetings are great for work colleagues, friends or family. Here's what you'll need to get started.

Supplies:

  • Tombow Dual Brush Pens

  • Strathmore Bristol or other cardstock

  • Tombow Mono Drawing Pen

  • Scissors

  • Tombow Mono Permanent Adhesive 

  • Individually-Wrapped Halloween Candy 

Make a Halloween Candy Card with Jessica Mack of BrownPaperBunny

Step 1: Draw a Cauldron

Using your Tombow Dual Brush Pens, draw a cauldron and some bubbles onto the right-hand side of your card. Try spooky Halloween colors like purples or oranges!

Make a Halloween Candy Card with Jessica Mack of BrownPaperBunny

Step 2: Cut Out The Cauldron

The next step is to carefully cut out the center of your cauldron, this way the candy will show through to the front once the card is finished. 

Make a Halloween Candy Card with Jessica Mack of BrownPaperBunny

Step 3: Add Detail

Use your Mono Drawing Pen to add lines around the bubbles and give them a little more definition.

Make a Halloween Candy Card with Jessica Mack of BrownPaperBunny

Step 4: Color The Background

Using your Dual Brush Pens again color the background of your Halloween candy card. If you want to leave the front of the card white you can skip this step.

Make a Halloween Candy Card with Jessica Mack of BrownPaperBunny

Step 5: Stick On Your Candy

Now fold your card in half, then use the cutout section on the front of your card to draw a cauldron outline on the inside of the card. Next, use your Mono Permanent Adhesive to cover the cauldron shape and stick down your Halloween candy.

Make a Halloween Candy Card with Jessica Mack of BrownPaperBunny

Voila, you're finished! It's time to hand out your delicious Halloween candy cards, who will you give yours to?

Make a Halloween Candy Card with Jessica Mack of BrownPaperBunny

I’d love to see how your Halloween candy cards came out, so tag @BrownPaperBunny on social media!

In Ink, Tutorial, Aug 2017
Comment
Make Fall Leaf Place Cards with Jessica Mack of BrownPaperBunny

Make Fall Leaf Place Cards

September 21, 2018

Please note: This blog post contains affiliate links, which help pay for the upkeep of this site. That being said, I will never, ever promote anything I am not 100% in love with!

----------

Fall is the perfect season to host lots of cozy dinner parties, so today I’m going to show you how to make some fun fall-themed place cards.  But first, you'll need to gather a few supplies. 

Supplies:

  • A pencil

  • Watercolor paper

  • Tombow Dual Brush Pens

  • Tombow Mono Drawing Pens

  • A paintbrush

  • Scissors

To create your fall-themed place cards start by using your pencil to draw a mason jar and some leaf shapes onto your watercolor paper.

Make Fall Leaf Place Cards with Jessica Mack of BrownPaperBunny

Next, color in your leaves with Dual Brush Pens, and use a wet paintbrush over the ink to get a watercolor effect. Once they are dry you can add lines and detail with your Mono Drawing pens, then cut everything out. Check out the time-lapse video below to see each step, sped up.

To finish off your place cards write your guest's name on the jar and fall-themed questions on the back of each leaf as conversation starters, then make a slit in the top of your mason jar, and arrange the leaves in the top.

Make Fall Leaf Place Cards with Jessica Mack of BrownPaperBunny

The cards look great laid on top of a plate or held up in a place-card holder.

What’s your favorite fall dish to have at a dinner party or pot-luck? 

In Aug 2017, Ink, Tutorial, Watercolor
6 Comments
Create a Floral Self-Portrait with Jessica Mack of BrownPaperBunny

Create a Floral Self-Portrait

September 15, 2018

Please note: This blog post contains affiliate links, which help pay for the upkeep of this site. That being said, I will never, ever promote anything I am not 100% in love with!

----------

Hello hello! Today I'm going to show you how to create an easy floral self-portrait. You could make one for all the members of your family and hang them on the wall together!

Here are the supplies you'll need to get started.

Supplies:

  • Tombow Dual Brush Pens
  • Watercolor Paper
  • Tombow Mono Drawing Pen
  • Pencil
  • Paintbrush
Create a Floral Self-Portrait with Jessica Mack of BrownPaperBunny

Step One: Draw Your Silhouette

An easy way to capture your profile silhouette is to sit near a wall with a lamp on your other side and have a friend or family member trace your shadow onto the paper. Once your silhouette has been captured you can go over it with Mono Drawing Pen to make it stand out.

Create a Floral Self-Portrait with Jessica Mack of BrownPaperBunny

Step Two: Fill Your Silhouette with Loose Floral Shapes

Using your Dual Brush Pens fill your silhouette with loose florals. Then, with your wet paintbrush, go over the ink to give it a soft watercolor effect. 

Create a Floral Self-Portrait with Jessica Mack of BrownPaperBunny

You can leave some white space, or fill everything in completely.

Create a Floral Self-Portrait with Jessica Mack of BrownPaperBunny

Step Three: Outline Your Flowers

This step is optional, but if you want to add a little more definition to your flower shapes, use your Mono Drawing Pen to add in some lines and details. 

Create a Floral Self-Portrait with Jessica Mack of BrownPaperBunny

Voila, you're ready to frame your self-portrait and hang it on the wall! And if flowers aren't your thing, you could fill your silhouette with patterns, fruit, or anything else that feels like you! If you really like tennis, fill it with tennis rackets and balls. Maybe books are more your thing, you could fill it with all your favorite titles. Tell me in the comments what you'd fill yours with!

I'd love to see your finished self-portrait, so share it on social media and tag @BrownPaperBunny!

In Portraits, Ink, Illustrations, Aug 2017, Tutorial, Watercolor
10 Comments
Make a Book Quote Wall Hanging with Jessica Mack of BrownPaperBunny

Make a Book Quote Wall Hanging

September 8, 2018

Please note: This blog post contains affiliate links, which help pay for the upkeep of this site. That being said, I will never, ever promote anything I am not 100% in love with!

----------

This week I am all about literature, so I’m going to show you an easy way to turn your favorite book quote into a wall hanging.

Supplies:

  • Tombow Dual Brush Pens
  • A page of text from the book (typed or handwritten)
  • Tombow Mono Drawing Pen
  • Pencil
  • A cute frame

The first step in creating your literature-inspired wall hanging is to letter your favorite quote onto your page of text. Using a separate sheet of paper I got my lettering just how I wanted then used a light-box to trace it onto my page filled with text.

Make a Book Quote Wall Hanging with Jessica Mack of BrownPaperBunny

Once your text is dry repeat the quote in a darker shade, and offset it slightly. This will create a fun drop shadow effect.

Make a Book Quote Wall Hanging with Jessica Mack of BrownPaperBunny

Once it is dry you can outline the words with your Mono Drawing Pen for extra impact. Then it’s time to frame it and hang it on the wall. I used a cute magnetic frame for mine.

Make a Book Quote Wall Hanging with Jessica Mack of BrownPaperBunny

What's your all-time favorite book? Let me know in the comments!


In Ink, Aug 2017, Tutorial, Type
9 Comments
Art Journaling with the Tombow XL Blending Palette by Jessica Mack of BrownPaperBunny

Art Journaling with the Tombow XL Blending Palette

September 1, 2018

Please note: This blog post contains affiliate links, which help pay for the upkeep of this site. That being said, I will never, ever promote anything I am not 100% in love with!

----------

Hello hello, today I'm going to show you a fun way to do some art journaling with the new Tombow XL Blending Palette! The new extra large size means you can color an entire journal page with a watercolor effect quickly and easily, so we're going to turn three pages into one (because why not). Here's what you'll need to get started.

Supplies:

  • Tombow XL Blending Palette

  • Your Art Journal (preferably one with thick pages to hold water without warping)

  • Tombow Dual Brush Pens

  • Water Spritzer

  • Tombow Mono Aqua Liquid Glue

  • Scissors

  • Tombow Mono Drawing Pen

  • Extra paper (preferably watercolor paper)

  • Tombow Mono Drawing Pencil (optional)

Art Journaling with the Tombow XL Blending Palette by Jessica Mack of BrownPaperBunny

Step 1: Ink Your XL Blending Palette

Start by scribbling some ink onto the XL Blending Palette with your Dual Brush Pens. You can try a few different colors together, like blues and greens or oranges and pinks. Then lightly spritz some water over the inked palette. Once the ink is wet lay your art journal page face down onto it. Smush it around to make sure the ink covers the page, then carefully lift it off (it might get drippy so it pays to lay down some scrap paper underneath). Once that page dries, repeat on the next page, and the one after that.

Art Journaling with the Tombow XL Blending Palette by Jessica Mack of BrownPaperBunny

Step 2: Cut Windows Into Your Pages

Who says you have to stick to just ONE page or spread when art journaling? We're going to cut windows through our first two pages to add some depth and dimension to our journal. Because I'm creating an underwater scene I cut my windows into wavy rectangles for a more organic look, but you can cut them out more neatly if you like. Keep your scraps for the next step!

Art Journaling with the Tombow XL Blending Palette by Jessica Mack of BrownPaperBunny

Step 3: Make Your Decorations

I used scraps of paper I had already colored with Tombow Dual Brush Pens, but you could create some on your spare watercolor paper using the same method as the journal pages above. Then draw on your shapes, patterns or whatever else you'd like with your Mono Drawing Pens.

Art Journaling with the Tombow XL Blending Palette by Jessica Mack of BrownPaperBunny

Step 4: Cut Out Your Decorations

Get out your scissors and start cutting out those fun little decorations you just created, then use your Mono Aqua Liquid Glue to stick them to the three different layers of your journal page(s).

Art Journaling with the Tombow XL Blending Palette by Jessica Mack of BrownPaperBunny

Step 5: Add Some Text

The final step is to add some words to your art journaling. Maybe you want to write something that happened that day, a memory, or a favorite quote.

Art Journaling with the Tombow XL Blending Palette by Jessica Mack of BrownPaperBunny

I'd would love to see your art journaling adventures! Tag @BrownPaperBunny on social media!

In Watercolor, Aug 2017, Tutorial, Sketchbook
10 Comments
How to Create a Watercolor Background for Your Lettering by Jessica Mack of BrownPaperBunny

How to Create a Watercolor Background for Your Lettering

September 1, 2018

Please note: This blog post contains affiliate links, which help pay for the upkeep of this site. That being said, I will never, ever promote anything I am not 100% in love with!

----------

I just love using Tombow Dual Brush Pens to create a watercolor effect and the new XL Blending Palette is perfect for that! Today I’m going to show you how I create watercolor backgrounds for lettering projects. You’ll need the XL Blending Palette, Dual Brush Pens in your favorite colors, a water mister, watercolor paper, and Mono Drawing Pen or Fudenosuke Pen.

How to Create a Watercolor Background for Your Lettering by Jessica Mack of BrownPaperBunny

To create your watercolor background start by adding some ink to your XL Blending Palette with your Dual Brush Pens. Spray a little water over the ink then press your watercolor paper down onto the palette. Blot any extra water with some paper towel, and if you want the color to run a little more you can spray water directly onto your paper. While you’re waiting for your paper to dry, wipe down your blending palette with damp paper towel and you’re ready to start again! What are your favorite colors to blend together?

How to Create a Watercolor Background for Your Lettering by Jessica Mack of BrownPaperBunny

Here's a video of the whole process.

Once your watercolor background is dry you’re ready to start your lettering project. I used Mono Drawing Pens, Dual Brush Pens and my Fudenosuke to create the lettering on this project. Do you have a favorite quote, let me know in the comments!

In Type, Ink, Watercolor, Aug 2017, Tutorial, Sketchbook
6 Comments
Make a Pencil Housewarming Card by Jessica Mack of BrownPaperBunny

Make a Pencil Housewarming Card

August 20, 2018

Please note: This blog post contains affiliate links, which help pay for the upkeep of this site. That being said, I will never, ever promote anything I am not 100% in love with!

----------

Hello hello! Today I want to show you how to make this cute little housewarming card using Mono Drawing Pencils! It's perfect to send to someone who's moving, going off to college, or maybe just bought their first home! Here's what you'll need to get started:

Supplies:

  • Tombow Mono Drawing Pencils
  • A ruler
  • A blank card
  • Tombow Mono Eraser
  • Tombow Dual Brush Pens (optional)
  • Paintbrush and water (optional)
Make a Pencil Housewarming Card by Jessica Mack of BrownPaperBunny

Step 1: Sketch Your Design

The first step is to sketch out your design on the front of the card. Get creative with the style of house (or houses) you draw. And if you are worried about drawing, don't be. Houses, in particular, are just a series of lines, squares, and rectangles. It will be easy, I promise! If you like you can add some text to the front of the card, or maybe just on the inside, it's up to you!

Make a Pencil Housewarming Card by Jessica Mack of BrownPaperBunny

Step 2: Add Shading to Your Card

Start coloring in your card design using the Mono Drawing Pencils. Use harder pencils (2H for example) for lighter shades, and softer pencils (2B, 4B, 6B) to get darker shades. And if you make a mistake, the beauty of drawing in pencil is that you can just use your Mono Eraser to fix it and start again!

Make a Pencil Housewarming Card by Jessica Mack of BrownPaperBunny

Step 3: Add Some Color (optional)

The final step is optional, if you want to add a little bit of color to your card. Choose a light color of Dual Brush Pen and draw on some ink around your house (or houses) then use a damp paintbrush (or your colorless blender) to wet the ink and blend it outwards for a soft glow effect. And then you're ready to send your card!

Make a Pencil Housewarming Card by Jessica Mack of BrownPaperBunny

If you create a housewarming card using the Mono Drawing Pencils I'd love to see it! Tag  @BrownPaperBunny on social media.

In Tutorial, Aug 2017, Illustrations
4 Comments
How to Make a Watercolor Background for Your Planner by Jessica Mack from BrownPaperBunny

Watercolor Background for Your Planner

August 9, 2018

Please note: This blog post contains affiliate links, which help pay for the upkeep of this site. That being said, I will never, ever promote anything I am not 100% in love with!

----------

Hello, hello! I'm collaborating with Bloom Planners this week and I’m super excited to show you an easy way to add a colorful background to your weekly spreads.

Here's what you'll need to get started:

  • Your favorite planner
  • Tombow Dual Brush Pens
  • XL Blending Palette
  • Water Mister or Spray Bottle

Optional Things to decorate with:

  • Tombow TwinTone Markers
  • Tombow Mono Adhesive + Permanent
  • Planner Stickers
  • Magnetic bookmark / Planner Band etc
How to Make a Watercolor Background for Your Planner by Jessica Mack from BrownPaperBunny

To quickly add a pop of background color to your planner start by scribbling some ink onto your blending palette with your Tombow Dual Brush Pens.

How to Make a Watercolor Background for Your Planner by Jessica Mack from BrownPaperBunny

Lightly mist the ink with water then press your planner page down onto the palette.

How to Make a Watercolor Background for Your Planner by Jessica Mack from BrownPaperBunny

Blot any excess water with some paper towel and give it a blast with a hairdryer or heat tool to dry it quickly and stop it seeping through to the next page. Which do you prefer, the blue or the pink page?

Once your watercolor background is dry you can start planning out your week and adding a little extra sparkle here and there! I had so much fun decorating this spread with Bloom stickers and Tombow TwinTone Markers! What are your favorite planner decorations?

How to Make a Watercolor Background for Your Planner by Jessica Mack from BrownPaperBunny

I love the Bloom Planner products, but one of the other reasons I love them so much is that the brand is run by a full team of awesome lady bosses, and that they are encouraging us all to grow and be the best women we can be!

In Aug 2017, Watercolor, Tutorial, Ink
Comment
Make Your Own Superhero Card by Jessica Mack of BrownPaperBunny

Make Your Own Superhero Card

July 26, 2018

Please note: This blog post contains affiliate links, which help pay for the upkeep of this site. That being said, I will never, ever promote anything I am not 100% in love with!

----------

Hello hello! Today I'm going to show you how to make your own superhero card. It's a great way to let someone know that they are a superhero to you (even if they don't technically have superpowers), and they'll only take you a few minutes to create!

Here's what you'll need to get started...

Supplies

  • Blank card or thick watercolor paper
  • Tombow Mono Drawing Pencil
  • Tombow Dual Brush Pens
  • Scissors
  • Tombow Mono Drawing Pen
  • Tombow 1500 Colored Pencils (optional)
Make Your Own Superhero Card by Jessica Mack of BrownPaperBunny

Step 1: Sketch Your Outlines

Use your Mono Drawing Pencils to lightly sketch a superhero crown or shield onto the bottom half of your card (which will end up being the front). You can make up your own using geometric shapes and bright colors. Then decide if you want to add words to the front, or maybe just the inside once you've folded the finished card. I sketched the words 'You are my superhero' onto the front of this one.

Make Your Own Superhero Card by Jessica Mack of BrownPaperBunny

Step 2: Add Some Color

Using your Dual Brush Pens color in your design. I usually start with the lightest colors first, letting them dry completely before I move onto the darker ones. By letting them dry fully you'll have less chance of bleeding where the colors touch.

Pro Tip: Use a wet paintbrush to blend the ink on your card for a watercolor look. Again, make sure you apply one color at a time and let each one dry completely before applying the next one. This technique works best on very thick card or thick watercolor paper.

Make Your Own Superhero Card by Jessica Mack of BrownPaperBunny

Step 3: Outline Your Design

Use your Mono Drawing Pens (I used number 03) to outline your design and give it that comic-book superhero look.

Make Your Own Superhero Card by Jessica Mack of BrownPaperBunny

Step 4: Add Some Shading

This step is optional, but you can use your Tombow 1500 Colored Pencils to add some subtle shading to your design to help it stand off the page a little more. I used a dark yellow around the stars, and along the edges of the blue stripes, and gave the crown a drop shadow using light grey.

Make Your Own Superhero Card by Jessica Mack of BrownPaperBunny

Step 5: Fold and Mail Your Superhero Card

All that's left is to fold your card, write in it and mail it off. If you want to add a little extra sparkle, decorate the envelope as well.

Make Your Own Superhero Card by Jessica Mack of BrownPaperBunny

I'd love to see your superhero-inspired projects! Tag @BrownPaperBunny on social media!

In Ink, Aug 2017, Tutorial
7 Comments
How to create an emoji mood wheel by Jessica Mack of BrownPaperBunny

Create an Emoji Mood Wheel

July 19, 2018

Hello, hello! Today I’m going to show you how to make a fun emoji wheel that you can stick up at your desk to let your coworkers or family know how you’re feeling. You’ll need some card, cut into a large circle, an arrow, and enough left over for eight smaller circles. Go ahead and grab a paper brad, some scissors, your Dual Brush Pens, Mono Aqua Liquid Glue, a pencil and a Mono Drawing Pen too! 

How to create an emoji mood wheel by Jessica Mack of BrownPaperBunny

The next steps in creating your emoji wheel are to color eight even segments on your large circle, and on the left-over card draw eight of your favorite emojis. Often feel like a unicorn? Go on, add it to your wheel! 

How to create an emoji mood wheel by Jessica Mack of BrownPaperBunny

To finish off your emoji wheel cut out your emojis and glue them into each segment of the wheel using your Mono Aqua Liquid Glue. Then use your paper brad to attach the arrow to the center and you’re finished!

How to create an emoji mood wheel by Jessica Mack of BrownPaperBunny

Comment below and tell me what emoji you feel like right now. 

In Tutorial, Aug 2017, Ink
Comment
Easy watercolor word art by Jessica Mack of BrownPaperBunny

Easy Watercolor Word Art

July 14, 2018

Please note: This blog post contains affiliate links, which help pay for the upkeep of this site. That being said, I will never, ever promote anything I am not 100% in love with!

----------

When I think of the color indigo I think of stargazing on warm summer nights. I just love the inky color of sky after the sun has completely disappeared. Today I'm going to show you how to make this easy watercolor word art so you can dream of the stars anytime you like.

Supplies:

  • Tombow Dual Brush Pens (N25 and 565)
  • 140 lb Watercolor paper
  • Tombow Mono Plastic Eraser
  • Paintbrush and water
  • Tombow Mono Drawing Pencil (4H)
Easy watercolor word art by Jessica Mack of BrownPaperBunny

Step 1: Sketch Your Words in Pencil

Use a nice light pencil (2H or 4H works well) to sketch in your words and stars. You'll be able to erase any visible lines at the end so don't worry about it being too neat at this stage.

Easy watercolor word art by Jessica Mack of BrownPaperBunny

Step 2: Outline Your Words

Outline your words and stars in black or charcoal Dual Brush Pen ink. This gives you greater contrast around the letters once everything is blended together.

Easy watercolor word art by Jessica Mack of BrownPaperBunny

Step 3: Color in the Background

Using your dark blue Dual Brush Pen (I used 565) fill in the background around your stars and words. You don't need to fill in every tiny space, it's ok if there is some white showing through. In the next step you're going to blend it all together anyway.

Easy watercolor word art by Jessica Mack of BrownPaperBunny

Step 4: Blend the Ink With Water

Using your paintbrush and some water start blending the ink together. I find it easiest to start with the fiddly bits around the letters and stars first and then fill in the larger areas. The ink won't be perfectly uniform, it will have dark areas and water marks, which gives you that great watercolor look.

Easy watercolor word art by Jessica Mack of BrownPaperBunny

Once you're happy with the way it is blended, let it dry, erase any visible pencil lines, and you're ready to frame your watercolor word art!

In Watercolor, Type, Ink, Tutorial, Aug 2017
2 Comments
Summer Happy Mail: Make Your Own Envelopes by Jessica Mack of BrownPaperBunny

Summer Happy Mail: Make Your Own Envelopes

July 8, 2018

Is there anything better than getting snail mail? Yes...getting cute, hand-made snail mail! So I'm going to show you a fun way to add a little summer surprise to the next mail you send out. You’ll need some watercolor or mixed media paper, Tombow Dual Brush Pens, a paintbrush and water, Tombow Mono Drawing Pen, scissors and Tombow Mono Adhesive + Permanent. 

Summer Happy Mail: Make Your Own Envelopes by Jessica Mack of BrownPaperBunny

We’re going to make our own envelopes with summer-themed decorations on the inside, so the recipient gets a fun surprise when they open it up! Gently open up an old envelope to use as a template, and measure out your watercolor paper to the right size. Fill the paper with ice-cream cones, watermelon slices, pineapples, or anything else that makes you think of summer, using your Tombow Dual Brush Pens. Then with a paintbrush wet the ink to blend it together and get a watercolor look. Once the ink is dry draw cute little faces or add details with your Mono Drawing Pen. 

Summer Happy Mail: Make Your Own Envelopes by Jessica Mack of BrownPaperBunny

To finish off your envelopes cut your paper using your envelope template, fold in the sides and glue the bottom three together with your Mono Adhesive + Permanent. Write a letter, or make a cute card to go inside and your fun summer envelopes are ready to be sent! Leave a comment and tell me who you’re going to send some cute mail to this summer! 

In Illustrations, Ink, Watercolor, Tutorial, Aug 2017
2 Comments
Older Posts →

Subscribe

Sign up to receive social media tips, freebies, special promotions, and art tutorials!

Thank you!

Please click confirm in the email you were just sent!

Directory of Illustration Jessica Mack

Shop my work on Society6

Watercolor World Map by Jessica Mack of BrownPaperBunny

Follow on Instagram

For the 100 Days Project this year I’m keeping it super low pressure. I’ve got a very busy couple of months coming up and want to set myself up to be able to stick with it, while still making sure I do something creative every day. You ca

See my classes on Skillshare

Skillshare Classes by Jessica Mack

Popular Posts

Popular Posts
CRL-Horizontal-Laptop-Beige-Floral-Painting.jpg
Creative Retreat Live
Rainbow-Watercolor-Wreath-Using-Markers.JPG
Rainbow Wreath Tutorial
15 Ways to Journal by Jessica on BrownPaperBunny
15 Ways to Journal
Tombow Brush Pen Markers and Colored Pencils
Brown Paper Bunny

Privacy + Terms of Use

Shop

Watercolor with Markers Book

Classes

Art Tutorials

Art & Illustration Portfolio

About

Contact

Custom Book Print

Custom Book Mug

How to Paint Watercolor Flowers Using Markers

Free Fashion Croquis

Start an Art Journal

6 Easy Flowers to Draw with Tombow Markers

Make Your Own Watercolor Bookmarks