• Book
    • Watercolor with Brush Pens
    • Watercolor Flowers Using Markers
    • Paint a Watercolor Galaxy Butterfly with Markers
    • Paint Watercolor Galaxy Bookmarks using Markers
    • Timelapse Video for Artists
  • Shop
  • Society6 Store
  • Blog
  • Portfolio
  • About
  • Contact
Menu

Brown Paper Bunny Studio

Art & Fashion Illustration
  • Book
  • Classes
    • Watercolor with Brush Pens
    • Watercolor Flowers Using Markers
    • Paint a Watercolor Galaxy Butterfly with Markers
    • Paint Watercolor Galaxy Bookmarks using Markers
    • Timelapse Video for Artists
  • Shop
  • Society6 Store
  • Blog
  • Portfolio
  • About
  • Contact
Watercolor flowers by Jessica Mack of BrownPaperBunny

Valentine's Watercolor Flowers

February 14, 2019

Happy Valentine’s Day! Don’t you just love love!? Whether you’re spending today with a partner, friend, or showing yourself some love I hope you are having a wonderful day.

These little flowers were painted using Prima’s Pastel Watercolor Confection set. If you’d like a discount on your own set, use the code ‘BrownPaperBunny15%’ to get 15% off Prima products here.

Watch the time-lapse video below to see how it all comes together.

In Dec 2018, Illustrations, Watercolor
6 Comments
How to Make a Valentine's Day Wreath by Jessica Mack of BrownPaperBunny

How to Make a Valentine's Day Wreath

January 28, 2019

Please note: This blog post contains affiliate links, which help pay for the upkeep of this site. That being said, I will never, ever promote anything I am not 100% in love with!

----------

Don’t you just love love?! Today I’m going to show you how to create a Valentine’s Day wreath that you could use on a card, or as a gift for someone special. Here’s what you’ll need to get started:

Supplies

  • Tombow Dual Brush Pens

  • Mono Graph Mechanical Pencil

  • Mono Knock Eraser

  • Watercolor Paper

  • Mono Drawing Pens

  • Paintbrush

How to Make a Valentine's Day Wreath by Jessica Mack of BrownPaperBunny

Step 1: Pencil Outlines

The first step in drawing your Valentine’s wreath is to trace a circle (I used an upside-down bowl) then start drawing flowers and leaves around the circle, using your Mono Graph Mechanical Pencil.

Step 2: First Layer of Color

Next, add your lightest color of Dual Brush Pen on the outlines of your flower petals, and use a wet paintbrush to blend it. This will give you a nice soft background color. Watch the time-lapse video below to see how it all comes together.

Step 3: Layers of Color

Once the first layer of ink is dry you can repeat with darker shades in certain areas. I chose to draw stylized chrysanthemums, what’s your favorite flower? Let me know in the comments!

Step 4: Finishing Touches

I added a quote to the center, and outlined the flowers and leaves using Mono Drawing Pens. Do you have a favorite quote or saying about love?

How to Make a Valentine's Day Wreath by Jessica Mack of BrownPaperBunny
In Watercolor, Ink, Dec 2018, Illustrations, Tutorial
13 Comments
Blending Markers with Water by Jessica Mack of BrownPaperBunny

Blending Markers with Water

January 10, 2019

Please note: This blog post contains affiliate links, which help pay for the upkeep of this site. That being said, I will never, ever promote anything I am not 100% in love with!

----------

One of my absolute favorite things is blending markers with water (specifically Tombow Dual Brush Pens) to create soft backgrounds you can draw over. Let me show you how I do it.

Supplies:

  • Tombow Dual Brush Pens

  • Watercolor Paper

  • Tombow Mono Drawing Pencil

  • Paintbrush

  • Tombow Blending Palette

Blending Markers with Water by Jessica Mack of BrownPaperBunny

Step 1: Blend Your Colors

Start by scribbling some Dual Brush Pen colors, that you'd like to blend, onto your blending palette. Then wet your paintbrush and blend the colors together until you have the shade you want. Next, use the paintbrush to paint the ink from your blending palette onto your watercolor paper to create a soft, watercolor-look background.

Blending Markers with Water by Jessica Mack of BrownPaperBunny

Step 2: Add More Color

If you want a little more variation in your background color, repeat step one with a different shade of the same color, or a color you think will go nicely with the first color you painted onto the paper. I used yellow, blues and greens for my leaves and pinks and yellow for my flowers. Add your new color to your existing ink on the paper while it is still wet, and watch the colors blend together!

Blending Markers with Water by Jessica Mack of BrownPaperBunny

Step 3: Add Details

Once your background colors are dry go back in with either the bullet or the brush tip of your Dual Brush Pen and add details over the top. This adds some nice contrast to the soft background. And there you have it — I hope blending markers with water will become one of your favorite ways to create too!

Blending Markers with Water by Jessica Mack of BrownPaperBunny

I’d love to see what you create, tag @BrownPaperBunny on social media so I can take a look!

Blending Markers with Water by Jessica Mack of BrownPaperBunny
In Pattern, Ink, Watercolor, Tutorial, Dec 2018, Illustrations
7 Comments
Watercolor Fashion Illustration from the Golden Globes red carpet by Jessica Mack of BrownPaperBunny

Watercolor Fashion Sketches

January 10, 2019

The weather here in Seattle has been particularly rainy of late, so I’ve been spending a lot more time inside. It’s not all gloomy though, more time at home means more time to create art! So I’ve been doing a lot more watercolor fashion illustrations to warm up, and thought I’d share a couple of them with you.

These first two were loosely inspired by Blaire Eadie, who I’ve been following on Instagram for years now.

View this post on Instagram

A post shared by Jessica 🎨 Seattle Artist (@brownpaperbunny) on Jan 8, 2019 at 10:19am PST

I painted these next two while watching the Golden Globes. I would have painted every single dress that walked down the red carpet if I’d had the time, they were all so lovely!

View this post on Instagram

A post shared by Jessica 🎨 Seattle Artist (@brownpaperbunny) on Jan 9, 2019 at 8:27am PST

Did you watch the Golden Globes this year?

Because I so often paint with Prima Watercolor Confections set they’ve given me a 15% off coupon to share with you. I believe it works on all Prima products, so use the code ‘BrownPaperBunny15%’ on your next purchase to save some dollars!

In Dec 2018, Fashion Illustration, Illustrations, Watercolor
8 Comments
Create Time-Lapse Videos of Your Art by Jessica Mack of BrownPaperBunny

New Skillshare Class: Create Time-Lapse Videos of Your Art

November 24, 2018

Hi friends!

I’ve spent the last few weeks preparing to launch my first ever Skillshare class, and it’s just gone live! If you’re not familiar with Skillshare, it is basically the Netflix of learning things…from painting to running a business.

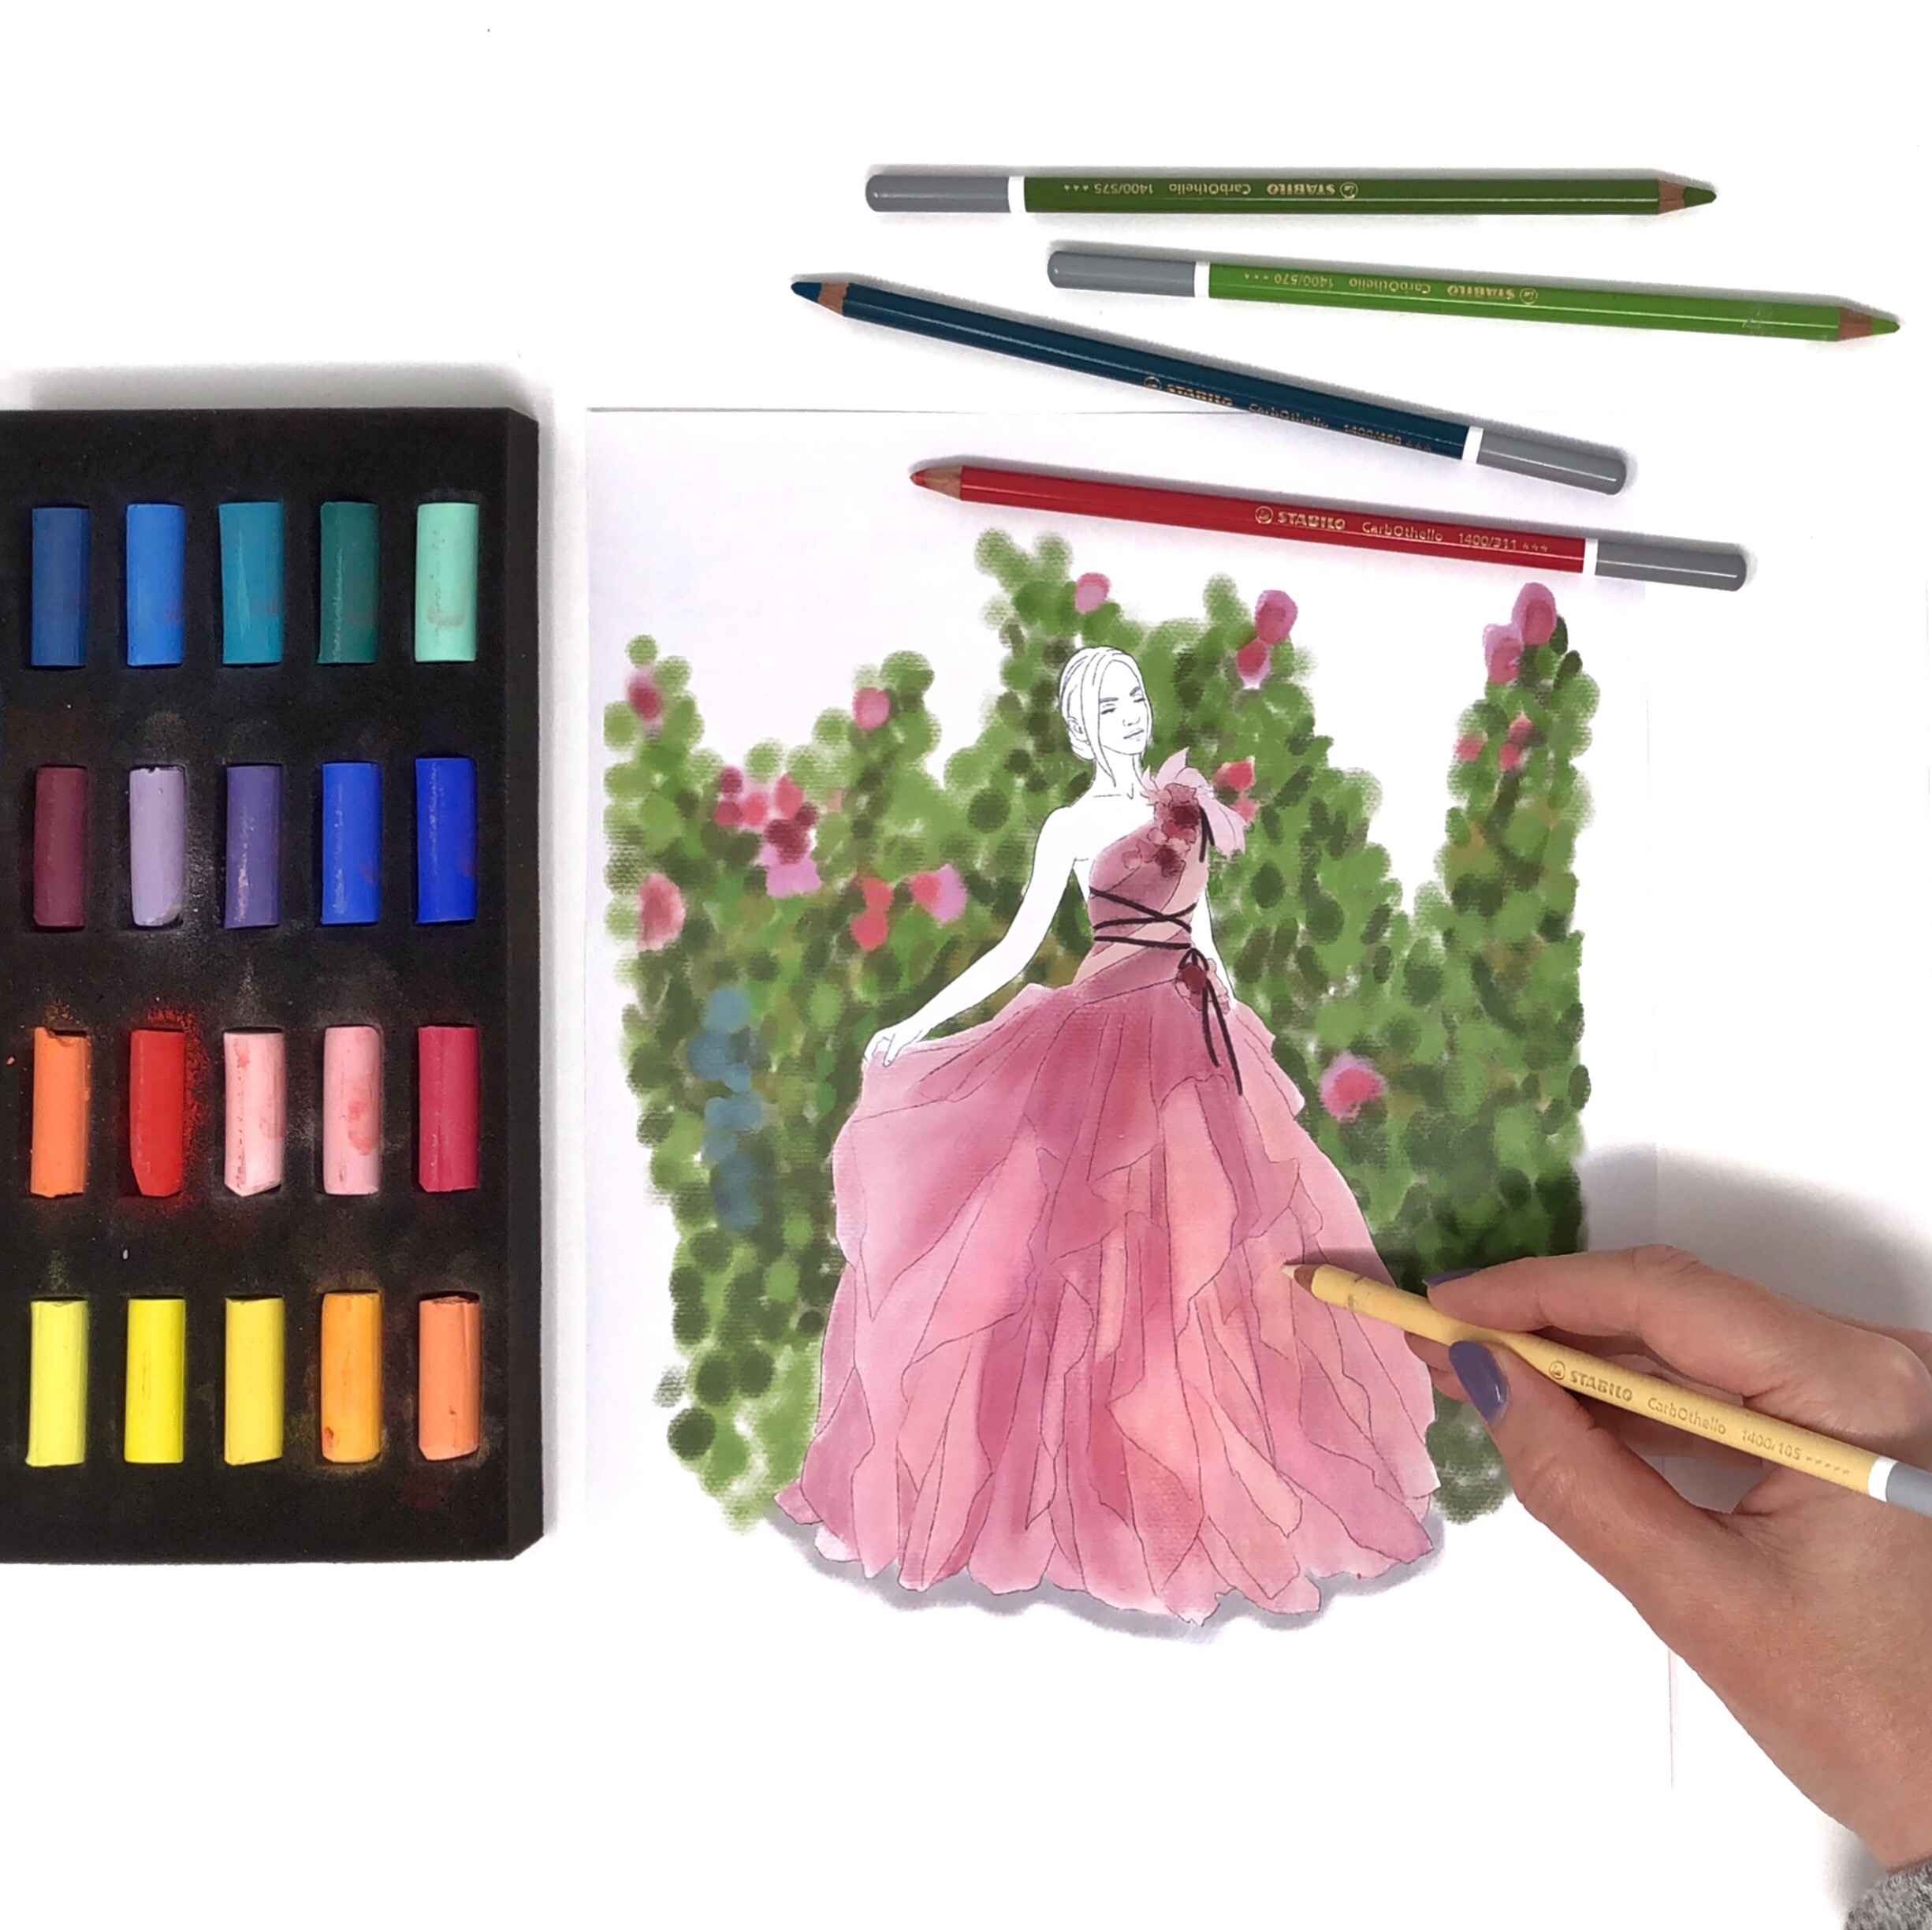
My class is called ‘Create Time-Lapse Videos of Your Art’. I attribute so much of my business and social media growth to time-lapse videos of my art. While I don’t often get featured on Instagram’s discover feed with my still pictures, my videos get listed there all the time, meaning a lot more people can find me. I’ve also had so many paying jobs come my way via Instagram videos, so I’m excited to tech you how to make them too.

And, Skillshare will give you two months free Premium Membership if you follow this link. You can always cancel before the two months are up, if you decide it isn’t for you, but having been learning amazing things on Skillshare for years I bet you’ll get hooked!

I’d love to know what you think of my new class!

Check it Out
In Aug 2017, Fashion Illustration, Illustrations, Ink, Social Media Tips, Tutorial
2 Comments
Draw a Fall Wreath in Jewel Tones by Jessica Mack of BrownPaperBunny

Draw a Fall Wreath in Jewel Tones

November 16, 2018

Please note: This blog post contains affiliate links, which help pay for the upkeep of this site. That being said, I will never, ever promote anything I am not 100% in love with!

----------

Hello hello! Today I’m going to show you how to draw a fall wreath in jewel tones. While I love the colors of changing leaves at this time of year I thought it would be fun to branch out (pun intended) and try some brighter jewel tones that are a little less associated with fall. This wreath is super easy to draw and looks great on cards, your art journal, or in your planner. Here's what you'll need to get started.

Supplies:

  • Tombow Dual Brush Pens (I chose 312, 346, 528, 606, and 946)

  • Watercolor paper or thick paper or card

  • Tombow Mono Drawing Pencil (2H or 4H)

  • Paintbrush

  • Water

Draw a Fall Wreath in Jewel Tones by Jessica Mack of BrownPaperBunny

Step 1: Sketch Your Wreath in Pencil

The first step is to sketch out your wreath, using a pencil. I chose a 4H pencil because it is super light. You can sketch in some flowers, leaves, and fruit at this stage, or just draw the basic circle you plan to follow.

Step 2: Create a Soft First Layer

Next you're going to use your lighter colors to draw in some lose branch shapes around the wreath. These are going to end up being your background branches to add depth to your drawing.

Draw a Fall Wreath in Jewel Tones by Jessica Mack of BrownPaperBunny

Go over them with a wet paintbrush to soften them and blend the ink together a little.

Draw a Fall Wreath in Jewel Tones by Jessica Mack of BrownPaperBunny

Step 3: Add Your Largest Leaves and Shapes

Once your background branches are dry, it's time to start adding your larger shapes. These can be flowers, large leaves, fruit etc. If you want to have a watercolor-look you can use your wet paintbrush to go over these shapes as well, to blend your marker strokes together. To see how I do this, watch the time-lapse video at the end of this blog post. 

Draw a Fall Wreath in Jewel Tones by Jessica Mack of BrownPaperBunny

Step 4: Creating Details

Once everything is dry it's time to go back in and add more details. You can use the brush or the fine tip of your Dual Brush Pens to create more leaves, branches, add detail to your flowers etc.

Draw a Fall Wreath in Jewel Tones by Jessica Mack of BrownPaperBunny

Step 5: Lettering

The final step is to add some lettering to the middle of your wreath. You could simply write the word 'Fall' like I did, or add your favorite quote, someone's name, or a holiday greeting.

Draw a Fall Wreath in Jewel Tones by Jessica Mack of BrownPaperBunny

Watch the video below to see how this wreath all came together. And share your own wreath on social media! Tag @BrownPaperBunny so I can see!

In Watercolor, Illustrations, Aug 2017, Tutorial, Ink, Type
3 Comments
Clara McSweeney in Marchesa in PaperFashion's Studio Garden. Photo by Jessica Mack of BrownPaperBunny

Degas Dream

October 21, 2018

Recently I spent the weekend in New York at Katie Rodger’s (PaperFashion) studio, in what felt like a Degas dream. We spent our time sketching ballerinas and runway models and learning how to use pastels with the incredibly talented Andy Espinoza. In the mornings and evenings I explored New York City, wandering through the MET, Central Park, or the Village (and eating way too much delicious food).

I came away from the weekend feeling inspired beyond words, so I wanted to share a few photos with you. You can find more photos and videos in my Instagram stories here.

Have you ever gone on an art retreat or taken a class that you just didn’t want to end?

  Katie’s  studio is such an inspirational and colorful place to work

Katie’s studio is such an inspirational and colorful place to work

 Underpainting for my Marchesa piece.

Underpainting for my Marchesa piece.

 Working on a Marchesa piece in pastel

Working on a Marchesa piece in pastel

  Katie ’s studio garden is a magical urban oasis

Katie’s studio garden is a magical urban oasis

 The extremely talented  @CateHurlin  and  @Erica_Llall

The extremely talented @CateHurlin and @Erica_Llall

 Exploring the way pastels interact with water

Exploring the way pastels interact with water

 The extremely talented  @CateHurlin  and  @Erica_Llall

The extremely talented @CateHurlin and @Erica_Llall

  Katie’s  studio is such an inspirational and colorful place to work

Katie’s studio is such an inspirational and colorful place to work

 The extremely talented  @CateHurlin  and  @Erica_Llall

The extremely talented @CateHurlin and @Erica_Llall

 The extremely talented  @CateHurlin  and  @Erica_Llall

The extremely talented @CateHurlin and @Erica_Llall

 This is the only time you’ll ever see me take a bathroom mirror selfie. ;)

This is the only time you’ll ever see me take a bathroom mirror selfie. ;)

  Katie’s  studio is such an inspirational and colorful place to work

Katie’s studio is such an inspirational and colorful place to work

IMG_9078.jpg
IMG_9110.jpg
IMG_9121.jpg
 Wonderful weekend work from  @Bonnieschen

Wonderful weekend work from @Bonnieschen

IMG_9126 2.jpg
 The impossibly tall and gorgeous  Clara McSweeny , wearing a stunning  Marchesa  gown.

The impossibly tall and gorgeous Clara McSweeny, wearing a stunning Marchesa gown.

 The impossibly tall and gorgeous  Clara McSweeny , wearing a stunning  Marchesa  gown.

The impossibly tall and gorgeous Clara McSweeny, wearing a stunning Marchesa gown.

  Katie’s  studio is such an inspirational and colorful place to work

Katie’s studio is such an inspirational and colorful place to work

IMG_9049.jpg
  Andy Espinoza ’s amazing artwork

Andy Espinoza’s amazing artwork

 The impossibly tall and gorgeous  Clara McSweeny , wearing a stunning  Marchesa  gown.

The impossibly tall and gorgeous Clara McSweeny, wearing a stunning Marchesa gown.

 The impossibly tall and gorgeous  Clara McSweeny , wearing a stunning  Marchesa  gown.

The impossibly tall and gorgeous Clara McSweeny, wearing a stunning Marchesa gown.

IMG_8880.jpg
 The impossibly tall and gorgeous  Clara McSweeny , wearing a stunning  Marchesa  gown.

The impossibly tall and gorgeous Clara McSweeny, wearing a stunning Marchesa gown.

 The impossibly tall and gorgeous  Clara McSweeny , wearing a stunning  Marchesa  gown.

The impossibly tall and gorgeous Clara McSweeny, wearing a stunning Marchesa gown.

 The impossibly tall and gorgeous  Clara McSweeny , wearing a stunning  Marchesa  gown.

The impossibly tall and gorgeous Clara McSweeny, wearing a stunning Marchesa gown.

IMG_8739.jpg
IMG_8741.jpg
  Katie’s  studio is such an inspirational and colorful place to work

Katie’s studio is such an inspirational and colorful place to work

  Katie’s  studio is such an inspirational and colorful place to work

Katie’s studio is such an inspirational and colorful place to work

 Katie’s studio garden is a magical urban oasis

Katie’s studio garden is a magical urban oasis

  Katie’s  studio is such an inspirational and colorful place to work

Katie’s studio is such an inspirational and colorful place to work

IMG_8757.jpg
 Stage one of my pastel portrait

Stage one of my pastel portrait

IMG_8716.jpg
 Katie’s studio garden is a magical urban oasis

Katie’s studio garden is a magical urban oasis

  Andy Espinoza ’s amazing artwork

Andy Espinoza’s amazing artwork

  Andy Espinoza ’s amazing artwork

Andy Espinoza’s amazing artwork

  Andy Espinoza ’s amazing artwork

Andy Espinoza’s amazing artwork

  Andy Espinoza ’s amazing artwork

Andy Espinoza’s amazing artwork

IMG_9081.jpg
IMG_9085.jpg
IMG_9087.jpg
IMG_9094.jpg
  Katie’s  studio is such an inspirational and colorful place to work

Katie’s studio is such an inspirational and colorful place to work

  Katie’s  studio is such an inspirational and colorful place to work

Katie’s studio is such an inspirational and colorful place to work

 The impossibly tall and gorgeous  Clara McSweeny , wearing a stunning  Marchesa  gown.

The impossibly tall and gorgeous Clara McSweeny, wearing a stunning Marchesa gown.

 The impossibly tall and gorgeous  Clara McSweeny , wearing a stunning  Marchesa  gown.

The impossibly tall and gorgeous Clara McSweeny, wearing a stunning Marchesa gown.

 My first drawing of  Clara McSweeny , wearing   Marchesa , done in pastel and graphite.

My first drawing of Clara McSweeny, wearing Marchesa, done in pastel and graphite.

 The impossibly tall and gorgeous  Clara McSweeny , wearing a stunning  Marchesa  gown.

The impossibly tall and gorgeous Clara McSweeny, wearing a stunning Marchesa gown.

  Katie’s  studio is such an inspirational and colorful place to work

Katie’s studio is such an inspirational and colorful place to work

FullSizeRender.jpg
IMG_9169.jpg
IMG_9126.jpg
  Katie  and I

Katie and I

 I want to live in Katie’s little garden!

I want to live in Katie’s little garden!

  Andy  and I

Andy and I

  Katie’s  studio is such an inspirational and colorful place to work  Underpainting for my Marchesa piece.  Working on a Marchesa piece in pastel   Katie ’s studio garden is a magical urban oasis  The extremely talented  @CateHurlin  and  @Erica_Llall   Exploring the way pastels interact with water  The extremely talented  @CateHurlin  and  @Erica_Llall    Katie’s  studio is such an inspirational and colorful place to work  The extremely talented  @CateHurlin  and  @Erica_Llall   The extremely talented  @CateHurlin  and  @Erica_Llall   This is the only time you’ll ever see me take a bathroom mirror selfie. ;)    Katie’s  studio is such an inspirational and colorful place to work IMG_9078.jpg IMG_9110.jpg IMG_9121.jpg  Wonderful weekend work from  @Bonnieschen  IMG_9126 2.jpg  The impossibly tall and gorgeous  Clara McSweeny , wearing a stunning  Marchesa  gown.   The impossibly tall and gorgeous  Clara McSweeny , wearing a stunning  Marchesa  gown.   Katie’s  studio is such an inspirational and colorful place to work IMG_9049.jpg   Andy Espinoza ’s amazing artwork  The impossibly tall and gorgeous  Clara McSweeny , wearing a stunning  Marchesa  gown.  The impossibly tall and gorgeous  Clara McSweeny , wearing a stunning  Marchesa  gown. IMG_8880.jpg  The impossibly tall and gorgeous  Clara McSweeny , wearing a stunning  Marchesa  gown.  The impossibly tall and gorgeous  Clara McSweeny , wearing a stunning  Marchesa  gown.  The impossibly tall and gorgeous  Clara McSweeny , wearing a stunning  Marchesa  gown. IMG_8739.jpg IMG_8741.jpg   Katie’s  studio is such an inspirational and colorful place to work   Katie’s  studio is such an inspirational and colorful place to work  Katie’s studio garden is a magical urban oasis   Katie’s  studio is such an inspirational and colorful place to work IMG_8757.jpg  Stage one of my pastel portrait IMG_8716.jpg  Katie’s studio garden is a magical urban oasis   Andy Espinoza ’s amazing artwork   Andy Espinoza ’s amazing artwork   Andy Espinoza ’s amazing artwork   Andy Espinoza ’s amazing artwork IMG_9081.jpg IMG_9085.jpg IMG_9087.jpg IMG_9094.jpg   Katie’s  studio is such an inspirational and colorful place to work   Katie’s  studio is such an inspirational and colorful place to work  The impossibly tall and gorgeous  Clara McSweeny , wearing a stunning  Marchesa  gown.  The impossibly tall and gorgeous  Clara McSweeny , wearing a stunning  Marchesa  gown.  My first drawing of  Clara McSweeny , wearing   Marchesa , done in pastel and graphite.  The impossibly tall and gorgeous  Clara McSweeny , wearing a stunning  Marchesa  gown.   Katie’s  studio is such an inspirational and colorful place to work FullSizeRender.jpg IMG_9169.jpg IMG_9126.jpg   Katie  and I  I want to live in Katie’s little garden!   Andy  and I

Many thanks to Andy Espinoza, Katie Rodgers, Marchesa, Clara McSweeney, Erica Llal, and Cate Hurlin for creating such a memorable weekend!

In Aug 2017, Fashion Illustration, Illustrations
3 Comments
Create a Floral Self-Portrait with Jessica Mack of BrownPaperBunny

Create a Floral Self-Portrait

September 15, 2018

Please note: This blog post contains affiliate links, which help pay for the upkeep of this site. That being said, I will never, ever promote anything I am not 100% in love with!

----------

Hello hello! Today I'm going to show you how to create an easy floral self-portrait. You could make one for all the members of your family and hang them on the wall together!

Here are the supplies you'll need to get started.

Supplies:

  • Tombow Dual Brush Pens
  • Watercolor Paper
  • Tombow Mono Drawing Pen
  • Pencil
  • Paintbrush
Create a Floral Self-Portrait with Jessica Mack of BrownPaperBunny

Step One: Draw Your Silhouette

An easy way to capture your profile silhouette is to sit near a wall with a lamp on your other side and have a friend or family member trace your shadow onto the paper. Once your silhouette has been captured you can go over it with Mono Drawing Pen to make it stand out.

Create a Floral Self-Portrait with Jessica Mack of BrownPaperBunny

Step Two: Fill Your Silhouette with Loose Floral Shapes

Using your Dual Brush Pens fill your silhouette with loose florals. Then, with your wet paintbrush, go over the ink to give it a soft watercolor effect. 

Create a Floral Self-Portrait with Jessica Mack of BrownPaperBunny

You can leave some white space, or fill everything in completely.

Create a Floral Self-Portrait with Jessica Mack of BrownPaperBunny

Step Three: Outline Your Flowers

This step is optional, but if you want to add a little more definition to your flower shapes, use your Mono Drawing Pen to add in some lines and details. 

Create a Floral Self-Portrait with Jessica Mack of BrownPaperBunny

Voila, you're ready to frame your self-portrait and hang it on the wall! And if flowers aren't your thing, you could fill your silhouette with patterns, fruit, or anything else that feels like you! If you really like tennis, fill it with tennis rackets and balls. Maybe books are more your thing, you could fill it with all your favorite titles. Tell me in the comments what you'd fill yours with!

I'd love to see your finished self-portrait, so share it on social media and tag @BrownPaperBunny!

In Portraits, Ink, Illustrations, Aug 2017, Tutorial, Watercolor
10 Comments
Make a Pencil Housewarming Card by Jessica Mack of BrownPaperBunny

Make a Pencil Housewarming Card

August 20, 2018

Please note: This blog post contains affiliate links, which help pay for the upkeep of this site. That being said, I will never, ever promote anything I am not 100% in love with!

----------

Hello hello! Today I want to show you how to make this cute little housewarming card using Mono Drawing Pencils! It's perfect to send to someone who's moving, going off to college, or maybe just bought their first home! Here's what you'll need to get started:

Supplies:

  • Tombow Mono Drawing Pencils
  • A ruler
  • A blank card
  • Tombow Mono Eraser
  • Tombow Dual Brush Pens (optional)
  • Paintbrush and water (optional)
Make a Pencil Housewarming Card by Jessica Mack of BrownPaperBunny

Step 1: Sketch Your Design

The first step is to sketch out your design on the front of the card. Get creative with the style of house (or houses) you draw. And if you are worried about drawing, don't be. Houses, in particular, are just a series of lines, squares, and rectangles. It will be easy, I promise! If you like you can add some text to the front of the card, or maybe just on the inside, it's up to you!

Make a Pencil Housewarming Card by Jessica Mack of BrownPaperBunny

Step 2: Add Shading to Your Card

Start coloring in your card design using the Mono Drawing Pencils. Use harder pencils (2H for example) for lighter shades, and softer pencils (2B, 4B, 6B) to get darker shades. And if you make a mistake, the beauty of drawing in pencil is that you can just use your Mono Eraser to fix it and start again!

Make a Pencil Housewarming Card by Jessica Mack of BrownPaperBunny

Step 3: Add Some Color (optional)

The final step is optional, if you want to add a little bit of color to your card. Choose a light color of Dual Brush Pen and draw on some ink around your house (or houses) then use a damp paintbrush (or your colorless blender) to wet the ink and blend it outwards for a soft glow effect. And then you're ready to send your card!

Make a Pencil Housewarming Card by Jessica Mack of BrownPaperBunny

If you create a housewarming card using the Mono Drawing Pencils I'd love to see it! Tag  @BrownPaperBunny on social media.

In Tutorial, Aug 2017, Illustrations
4 Comments
Summer Happy Mail: Make Your Own Envelopes by Jessica Mack of BrownPaperBunny

Summer Happy Mail: Make Your Own Envelopes

July 8, 2018

Is there anything better than getting snail mail? Yes...getting cute, hand-made snail mail! So I'm going to show you a fun way to add a little summer surprise to the next mail you send out. You’ll need some watercolor or mixed media paper, Tombow Dual Brush Pens, a paintbrush and water, Tombow Mono Drawing Pen, scissors and Tombow Mono Adhesive + Permanent. 

Summer Happy Mail: Make Your Own Envelopes by Jessica Mack of BrownPaperBunny

We’re going to make our own envelopes with summer-themed decorations on the inside, so the recipient gets a fun surprise when they open it up! Gently open up an old envelope to use as a template, and measure out your watercolor paper to the right size. Fill the paper with ice-cream cones, watermelon slices, pineapples, or anything else that makes you think of summer, using your Tombow Dual Brush Pens. Then with a paintbrush wet the ink to blend it together and get a watercolor look. Once the ink is dry draw cute little faces or add details with your Mono Drawing Pen. 

Summer Happy Mail: Make Your Own Envelopes by Jessica Mack of BrownPaperBunny

To finish off your envelopes cut your paper using your envelope template, fold in the sides and glue the bottom three together with your Mono Adhesive + Permanent. Write a letter, or make a cute card to go inside and your fun summer envelopes are ready to be sent! Leave a comment and tell me who you’re going to send some cute mail to this summer! 

In Illustrations, Ink, Watercolor, Tutorial, Aug 2017
2 Comments
Watercolor Watermelons by Jessica Mack of BrownPaperBunny

Watercolor Watermelon

June 4, 2018

Please note: This blog post contains affiliate links, which help pay for the upkeep of this site. That being said, I will never, ever promote anything I am not 100% in love with!

----------

Today I want to show you how to create some watercolor-look watermelons that you can use on all sorts of fun summer projects! Here's what you'll need to get started.

Supplies:

  • Tombow Dual Brush Pens (Numbers 847, 245 and N15)
  • 140 lb Watercolor Paper
  • Paintbrush
  • Jar of Water
  • Scissors
  • String
Watercolor Watermelons by Jessica Mack of BrownPaperBunny

Project 1: Watermelon Wallpaper for Your Phone

The first step is to draw your watermelon shapes onto the watercolor paper. Using Tombow Dual Brush Pen number 847 (Crimson), draw half moon, full circle, or triangle pieces of watermelon, or a combination of different shapes. Next, go over the ink with your wet paintbrush so the ink blends together. Once that dries, draw the watermelon rind using Dual Brush Pen 245 (Sap Green), and wet the green ink with your paintbrush too. Once both colors are dry, draw watermelon seeds with Dual Brush Pen N15 (Black). Watch the video below to see each of the steps.

Once you've filled the page, snap a photo and turn your delicious little watermelons into a wallpaper (or background) for your phone, like the image below!

Watercolor Watermelons by Jessica Mack of BrownPaperBunny

Project 2: Watermelon Cards

Because watercolor paper is pretty thick you can cut cute little cards out of your finished watermelon drawings. Experiment with a variety of sizes for different effects. Your friends and family will love getting these refreshing cards in the mail!

Watercolor Watermelons by Jessica Mack of BrownPaperBunny

Project 3: Watermelon Banner

Cut around each of your watermelon shapes, punch holes in each side and you can thread them together to make a cute summer banner. I drew simple faces on these ones instead of watermelon seeds. These can add a fun addition to a summer BBQ or birthday party, or just string them up in your kitchen for a daily dose of cute.

Watercolor Watermelons by Jessica Mack of BrownPaperBunny

I'd love to see your watercolor watermelon projects! Share them with me on social media by tagging @BrownPaperBunny!

In Aug 2017, Free Downloads, Illustrations, Ink, Pattern, Tutorial, Watercolor
Comment
How to Make Watercolor Wedding Invitations by Jessica Mack of BrownPaperBunny

How to Make Watercolor Wedding Invitations

June 4, 2018

Please note: This blog post contains affiliate links, which help pay for the upkeep of this site. That being said, I will never, ever promote anything I am not 100% in love with!

----------

If your big day is coming up and you want to make your own watercolor wedding invitations (these work well for baby showers, engagement parties, and bridal showers too) then you're in luck! I often create custom wedding invitation artwork for brides but today I’m going to show you three watercolor-look invitations you can create yourself, with your Tombow Dual Brush Pens.

Supplies:

  • Smooth watercolor paper
  • A paintbrush
  • Jar of water
  • Tombow Dual Brush Pens in the colors of your wedding or event

Romantic Wedding Invitation

Start by drawing some flower and leaf shapes with your Dual Brush Pens then soften the edges with water and your paintbrush. Let it dry and repeat if you want a little extra color. Scan or photograph your artwork and add the text on your computer and voila, your invitations are ready for printing! Watch the time-lapse video below to see the steps sped up.

Feminine Wedding Invitation

To create these invitations start by adding some color to the corners of your watercolor paper, using Tombow Dual Brush Pens, then blend and soften the ink using water and a paintbrush. Once the paper is dry, draw some simple flowers using Tombow Mono Drawing Pens. Scan or photograph your artwork and add the event details on your computer.

How to Make Watercolor Wedding Invitations by Jessica Mack of BrownPaperBunny

Modern Invitation

This last wedding invitation is a little more subtle and modern. Start by coloring a one inch strip at the bottom of your 140 lb watercolor paper, using a Tombow Dual Brush Pen in your event color. Next, use a paintbrush and some water to wet the ink and drag the water up the paper (by going back and forth horizontally) until you have a gradient effect. Once the paper is dry take a photo or scan it and add the event details on your computer and you’re ready to print your invitations!

How to Make Watercolor Wedding Invitations by Jessica Mack of BrownPaperBunny

Of the three invitations I showed you today which was your favorite? If you know someone who is getting married, send them a link to this post!

In Aug 2017, Illustrations, Ink, Tutorial, Watercolor
7 Comments
50 Ways to Draw Your Ordinary Life by Jessica Mack of BrownPaperBunny

50 Ways to Draw

May 22, 2018

Please note: This blog post contains affiliate links, which help pay for the upkeep of this site. That being said, I will never, ever promote anything I am not 100% in love with!

----------

I was sent a review copy of 50 Ways to Draw Your Beautiful Ordinary Life by the creators of Flow Magazine and OMG it is beautiful!

There are step-by-step instructions for drawing adorable objects, along with a pull-out sketchbook, paper dolls, postcards and watercolor paper — basically I'm in heaven!

I've been having so much fun sketching the things around me, as well as working through the book to draw some of the objects they have in there. 

I'd definitely recommend checking it out! 

In Aug 2017, Illustrations, Ink, Product Reviews, Sketchbook, Watercolor
Comment
Watercolor and Ink Illustrated Map by Jessica Mack from BrownPaperBunny

The Art of Map Illustration

May 14, 2018

Please note: This blog post contains affiliate links, which help pay for the upkeep of this site. That being said, I will never, ever promote anything I am not 100% in love with!

----------

I've been in love with maps since I was a little girl, and while I might still have trouble navigating with them, they spark my wanderlust and make me dream of far away places and adventures yet to be had.

I was recently given a review copy of The Art of Map Illustration: A Step-By-Step Artistic Exploration of Contemporary Cartography and Mapmaking by James Gulliver Hancock, Hennie Haworth, Stuart Hill and Sarah King and I have been having SO much fun working my way through it. There are over 75 examples of beautifully illustrated maps, along with all the techniques, tricks, and tips you need to create your own! 

Watercolor and Ink Illustrated Map by Jessica Mack from BrownPaperBunny

For my first illustrated map I'm drawing the downtown Edmonds city center. We've recently moved to the Seattle area and I've fallen in love with Edmonds. It has views of The Puget Sound, the Olympic Mountains, and is filled with the cutest little cafes, restaurants, bookstores, galleries and art shops you'll ever find! This is a work in progress (I plan to add a lot more of my favorite shops) but here's what I've done so far. I've got the Edmonds Ferry, Art Spot, Salt & Iron restaurant and the little water fountain in the center of town.

Watercolor and Ink Illustrated Map by Jessica Mack from BrownPaperBunny

Have you ever drawn your own map? Leave me a comment and let me know!

In Aug 2017, Illustrations, Ink, Product Reviews, Watercolor
10 Comments
How to Draw an Anemone Flower by Jessica Mack from BrownPaperBunny

How To Draw An Anemone Flower

April 19, 2018

Please note: This blog post contains affiliate links, which help pay for the upkeep of this site. That being said, I will never, ever promote anything I am not 100% in love with!

----------

With Earth Day coming up I thought I’d show you how to draw one of my favorite flowers, the anemone. They’re super simple to draw, come in a rainbow of colors and look great on cards, in your planner, or as wall art!

Here’s what you’ll need to get started.

Supplies:

  • Pencil (My favorite is the Tombow MONO Drawing Pencil)

  • Tombow MONO Knock Eraser

  • Tombow Dual Brush Pens

  • Paper (I’m using Strathmore Heavyweight Mixed Media paper)

  • Tombow Blending Palette

  • Paintbrush

  • Tombow MONO Drawing Pen (optional: for line work)

How to Draw an Anemone Flower by Jessica Mack from BrownPaperBunny

Step 1: Drawing the Anemone Shape

There are really only four simple steps for drawing an anemone flower. Start with a circle, then leaving a gap, draw small oval shapes and connect them to the center circle with thin lines. This will be the flower’s stamen. Next work your way around the center, drawing the petals. It helps to move the paper as you go, so the petal you’re drawing is always right in front of you. Don’t worry if the shapes are a little wonky, real flower petals are never exactly the same!

I’m drawing mine in ink so you can see the lines, but I recommend drawing your initial flower shape using light pencil lines.

How to Draw an Anemone Flower by Jessica Mack from BrownPaperBunny

Step 2: Adding Color to Your Anemone

I love using the Tombow Dual Brush Pens as watercolor, especially when adding color to flowers. A great way to do this is by using the Blending Palette. Draw some ink directly onto the blending palette then use a wet paintbrush to transfer the ink to your paper.

Anemones come in so many different colors that you can really have fun with this step. Try creating a rainbow bouquet, or perhaps a line of them in different shades of the same color.

How to Draw an Anemone Flower by Jessica Mack from BrownPaperBunny

If you use anemones in your own project I'd love to see! Tag @BrownPaperBunny on social media.

In Aug 2017, Illustrations, Ink, Tutorial, Watercolor
16 Comments
100 Days of Flowers and Faces by Jessica Mack of BrownPaperBunny

The 100 Day Project 2018

April 19, 2018

The 100 Day Project is designed to make creativity a habit. The theory is that if you can do something for 100 straight days it will be easier to keep doing it after that. So each April, hundreds of thousands of artists, photographers, and other creatives pick a theme or project for themselves and start creating. 

For 2018 my project is 100 Days of Flowers and Faces (because I couldn't choose between the two). I'm creating them in all manner of styles and using lots of different media from acrylic paint to markers, colored pencils, and collage. 

Here is my progress so far: 

Day 1

A post shared by Jessica 🎨 Seattle Artist (@brownpaperbunny) on Apr 3, 2018 at 5:10am PDT

Day 2

A post shared by Jessica 🎨 Seattle Artist (@brownpaperbunny) on Apr 4, 2018 at 6:48am PDT

Day 3

A post shared by Jessica 🎨 Seattle Artist (@brownpaperbunny) on Apr 5, 2018 at 8:04am PDT

Day 4

Does art imitate life or does life imitate art? Either way, these colors are blooming with possibility. Day 4 of #100DaysofFlowersandFaces for #the100dayproject pic.twitter.com/OD5afkQDFQ

— Jessica Mack (@BrownPaperBunny) April 6, 2018

Day 5

A post shared by Jessica 🎨 Seattle Artist (@brownpaperbunny) on Apr 7, 2018 at 6:01pm PDT

Day 6

A post shared by Jessica 🎨 Seattle Artist (@brownpaperbunny) on Apr 8, 2018 at 6:58pm PDT

Day 7

A post shared by Jessica 🎨 Seattle Artist (@brownpaperbunny) on Apr 9, 2018 at 5:25pm PDT

Day 8

A post shared by Jessica 🎨 Seattle Artist (@brownpaperbunny) on Apr 10, 2018 at 7:46am PDT

Day 9

A post shared by Jessica 🎨 Seattle Artist (@brownpaperbunny) on Apr 11, 2018 at 6:49am PDT

Day 10

Day 10/100 of #100DaysofFlowersAndFaces — not everything works out quite how you picture it in your head. But I figure failed experiments are still useful. #the100dayproject #watercolor pic.twitter.com/A0Xr3OTrOQ

— Jessica Mack (@BrownPaperBunny) April 13, 2018

Day 11

A post shared by Jessica 🎨 Seattle Artist (@brownpaperbunny) on Apr 13, 2018 at 6:57am PDT

Day 12

A post shared by Jessica 🎨 Seattle Artist (@brownpaperbunny) on Apr 14, 2018 at 6:11pm PDT

Day 13

A post shared by Jessica 🎨 Seattle Artist (@brownpaperbunny) on Apr 15, 2018 at 8:53pm PDT

Day 14

A post shared by Jessica 🎨 Seattle Artist (@brownpaperbunny) on Apr 16, 2018 at 4:43pm PDT

Day 15

A post shared by Jessica 🎨 Seattle Artist (@brownpaperbunny) on Apr 17, 2018 at 7:56am PDT

Day 16

I forgot to post Day 16/100 of #100DaysOfFlowersAndFaces you can follow my Anemone drawing tutorial over on the @tombowusa blog: https://t.co/JpxWstBqkZ #the100dayproject pic.twitter.com/SnFeclK1T4

— Jessica Mack (@BrownPaperBunny) April 19, 2018

Day 17

A post shared by Jessica 🎨 Seattle Artist (@brownpaperbunny) on Apr 19, 2018 at 6:50am PDT

Leave me a comment and let me know if you're doing The 100 Day Project this year, and if you are, what you theme or project is! 

In Aug 2017, Fashion Illustration, Illustrations, Ink, Portraits, Sketchbook, Watercolor
14 Comments
Easy Ways to Create Mail Art by Jessica Mack of BrownPaperBunny

3 Mail Art Techniques

March 4, 2018

Please note: This blog post contains affiliate links, which help pay for the upkeep of this site. That being said, I will never, ever promote anything I am not 100% in love with!

----------

One of my favorite creative hobbies is mail art, AND one of my 2018 resolutions is to send more snail mail, so I’m going to walk you through three easy-to-create types of mail art.

The first technique is decorating the envelope with patterns or doodles. You’ll need some blank envelopes, Tombow MONO Drawing Pens, Dual Brush Pens, a ruler, MONO Eraser and pencil (if you’re like me and have trouble writing in a straight line without guides). 

Easy Ways to Create Mail Art by Jessica Mack of BrownPaperBunny

This technique focuses more on fun lettering and a little less on envelope decoration (although you could always combine the two for that extra WOW factor). Make the name of the recipient really stand out and have some fun with your lettering! Just make sure the address is still legible. The supplies you’ll need are blank envelopes, your Tombow Dual Brush Pens, MONO Drawing Pens, pencil, eraser, and a ruler.

Easy Ways to Create Mail Art by Jessica Mack of BrownPaperBunny

And now for my all-time favorite mail art technique. This one has the name and address of the recipient inside a drawing. This fun balloon design would be great with a birthday card, and click through on the Instagram post below to see how to use the Tombow Dual Brush Pens to create a watercolor-look umbrella design. For this technique you’ll need thick envelopes, a paint-brush, jar of water, Tombow Blending Palette, MONO Drawing Pens, pencil, eraser, and of course Dual Brush Pens in your favorite colors. Will you be creating any mail art in 2018?

Easy Ways to Create Mail Art by Jessica Mack of BrownPaperBunny

A post shared by Jessica 🎨 Fashion Illustration (@brownpaperbunny) on Jan 29, 2018 at 7:31pm PST

In Aug 2017, Illustrations, Ink, Tutorial, Type, Watercolor
21 Comments
How to Create Watercolor Flowers with Tombow Dual Brush Pens by Jessica Mack of BrownPaperBunny

How to Create Watercolor Flowers with Markers

March 4, 2018

Please note: This blog post contains affiliate links, which help pay for the upkeep of this site. That being said, I will never, ever promote anything I am not 100% in love with!

----------

One of my favorite things is painting and drawing flowers, and one of the easiest ways to do it is by using water-soluble markers such as Tombow Dual Brush Pens! So here are my top three tips for creating watercolor-look flowers with your markers. 

Supplies: 

  • Thick watercolor paper (preferably 140 lb / 300 g or in a block to prevent warping)

  • Tombow Dual Brush Pens in your favorite colors

  • Blending Palette

  • Jar of Water

  • Paintbrush

You can use my affiliate code ‘bpbunny15’ for 15% off all Tombow products.

How to Create Watercolor Flowers with Tombow Dual Brush Pens by Jessica Mack of BrownPaperBunny

Tip 1:

Stay as loose as possible. The unpredictable nature of watercolor is part of its charm, so embrace the flow, drips, and color bleeds. Basically, don’t try to paint too perfectly or control it too much! 

How to Create Watercolor Flowers with Tombow Dual Brush Pens by Jessica Mack of BrownPaperBunny

Click through to see the video.

A post shared by Jessica 🎨 Fashion Illustration (@brownpaperbunny) on Feb 28, 2018 at 12:22pm PST

Tip 2: 

Use more than one color or shade for more interesting flowers. If you’re using mostly pinks, throw in a tiny bit of orange or yellow, or different shades of the same color for variation. And always start with the lightest color first (allowing layers to dry in-between) that way you’ll keep everything from bleeding together completely, and you can have some light color show through the gaps when you put the darker colors on last.

How to Create Watercolor Flowers with Tombow Dual Brush Pens by Jessica Mack of BrownPaperBunny

Click through to see the video.

A post shared by Jessica 🎨 Fashion Illustration (@brownpaperbunny) on Mar 1, 2018 at 12:02pm PST

Tip 3: 

For a softer, more watery look scribble Tombow ink onto your Blending Palette and then use a wet paintbrush to transfer the ink to the paper. But for a more vibrant and saturated look draw with the Dual Brush Pens directly onto the watercolor paper and then use your paintbrush to wet the ink there.

How to Create Watercolor Flowers with Tombow Dual Brush Pens by Jessica Mack of BrownPaperBunny

Click through to see the video.

A post shared by Jessica 🎨 Fashion Illustration (@brownpaperbunny) on Mar 2, 2018 at 6:53pm PST

If you’re new here, I’m Jessica — a watercolor artist and fashion illustrator from Australia (but now living in Seattle, Washington). I’d love to connect on social media, come say hi on Instagram, Facebook or Twitter @BrownPaperBunny! 

You might like to check out my new book: Watercolor with Markers

Watercolor with Markers by Jessica Mack

You might also like these blog posts:

Featured
CRL-Horizontal-Laptop-Beige-Floral-Painting.jpg
Creative Retreat Live
Rainbow-Watercolor-Wreath-Using-Markers.JPG
Rainbow Wreath Tutorial
JessicaMack-Mothers-Day-Art-8.jpg
Make Your Own Mother's Day Art
Galaxy-Butterfly-1.jpg
Watercolor Galaxy Butterfly
In Aug 2017, Illustrations, Ink, Tutorial, Watercolor
21 Comments
How to Draw Pretty Patterns in Your Planner by Jessica Mack of BrownPaperBunny

How to Draw Pretty Planner Patterns

March 4, 2018

Can you believe we're so far through 2018 already?! It is definitely time to get organized, so pull out your 2018 planner and I'll show you how to create pretty patterns to liven up the pages and make it easier to distinguish one week from the next.

Supplies:

  • Tombow TwinTone Marker Set, 12-Pack Pastel
  • Tombow MONO Drawing Pen, 3-Pack
  • Your favorite planner or bullet journal

I love the TwinTone Markers and MONO Drawing Pens because they don't bleed through the super-thin pages of my planner, and by having the option to create a variety of line thicknesses you can add beautiful variation to your patterns!

How to Draw Pretty Patterns in Your Planner by Jessica Mack of BrownPaperBunny

My planner has a fairly boring header section so that's where I'm going to put my pattern on each page. You can do all of the pages at the start of the year, or do each one as you get to it. Either way the patterns will help you to quickly find the page you're looking for and make each one different to the last.

How to Draw Pretty Patterns in Your Planner by Jessica Mack of BrownPaperBunny

Start by using the TwinTone Markers to create patterns out of simple shapes. If you're stuck for pattern ideas, look around you. Household and office items make great pattern inspiration. Use the leaves on your fikas, the lipstick in your handbag, or even fruit from the kitchen!

How to Draw Pretty Patterns in Your Planner by Jessica Mack of BrownPaperBunny

You can create some of the patterns in color, and some in black and white using just the MONO Drawing Pens. Try varying the shapes and lines by using the 01, 03, and 05 sized pens.

How to Draw Pretty Patterns in Your Planner by Jessica Mack of BrownPaperBunny

Then, why not combine the two, laying down color with the TwinTone Markers, and adding detail and lines with the MONO Drawing Pens.

How to Draw Pretty Patterns in Your Planner by Jessica Mack of BrownPaperBunny

You can watch a little flip through of some finished pages over on the Tombow Blog. I'd love to see your patterns, tag @BrownPaperBunny on social media so I can see!

In Aug 2017, Illustrations, Ink, Pattern, Tutorial
Comment
Easy to Make Ultra Violet Nursery Wall Art by Jessica Mack of BrownPaperBunny

Easy-to-Make Ultra Violet Nursery Art

March 4, 2018

Today I've got a little tutorial to show you how to easily incorporate the 2018 Pantone Color of the Year, Ultra Violet, into your nursery or children's room. These easy-to-make nursery art pieces look great framed, and will only take you a few minutes to put together.

Here are the supplies you'll need to get started.

Supplies:

  • Watercolor paper
  • Tombow Dual Brush Pens in numbers 606-Violet, and 603-Periwinkle for accents.
  • A white paint pen, or if you want black lines use your N-15 Black Tombow Dual Brush Pen
  • Tombow MONO Glue Pen
  • Plastic freezer bag, or other large piece of plastic
  • Paper towel
  • Water Spray Mister
  • Scissors
  • Frames
Easy to Make Ultra Violet Nursery Wall Art by Jessica Mack of BrownPaperBunny

Now let's get started!

Step 1:

I used the MONO Glue Pen to draw some stars and other little details onto my watercolor paper. Once the glue dries it acts like a resist and will keep that area of the paper free from color.

Easy to Make Ultra Violet Nursery Wall Art by Jessica Mack of BrownPaperBunny

Step 2:

Scribble some ink from your Dual Brush Pens onto your freezer bag. I added a few dots of Dual Brush Pen 528-Navy Blue for interest but that's entirely optional.

Easy to Make Ultra Violet Nursery Wall Art by Jessica Mack of BrownPaperBunny

Step 3:

User your spray mister to wet the freezer bag and ink. It pays to put some paper towel underneath in case any of the water or ink jumps off the bag unintentionally.

Easy to Make Ultra Violet Nursery Wall Art by Jessica Mack of BrownPaperBunny

Step 4:

Place your watercolor paper down onto the bag and press the back in circular motions to make sure the ink covers the whole front of the paper. Carefully lift the paper from the bag, and place it (ink-side up) on some spare paper towel to dry.

Easy to Make Ultra Violet Nursery Wall Art by Jessica Mack of BrownPaperBunny

Step 5:

Draw your designs onto the dried watercolor paper. You can draw or write whatever you'd like. I chose an outline of Washington State with 'Home Sweet Home', a Kawaii cacti, and the words 'Twinkle Twinkle Little Star' surrounded by stars. You can also cut the paper into fun shapes to make them a little different. This is where I used the 603-Periwinkle Dual Brush Pen to outline the letters and help them stand out a little more.

Easy to Make Ultra Violet Nursery Wall Art by Jessica Mack of BrownPaperBunny
Nursery-Jessica-Mack-8.jpg

And you're done! Frame those babies and add a little Ultra Violet color to your walls!

I'd love to see what you create, tag @BrownPaperBunny on social media to show me.

In Aug 2017, Illustrations, Ink, Tutorial, Watercolor, Type
Comment
← Newer Posts Older Posts →

Subscribe

Sign up to receive social media tips, freebies, special promotions, and art tutorials!

Thank you!

Please click confirm in the email you were just sent!

Directory of Illustration Jessica Mack

Shop my work on Society6

Watercolor World Map by Jessica Mack of BrownPaperBunny

Follow on Instagram

For the 100 Days Project this year I’m keeping it super low pressure. I’ve got a very busy couple of months coming up and want to set myself up to be able to stick with it, while still making sure I do something creative every day. You ca

See my classes on Skillshare

Skillshare Classes by Jessica Mack

Popular Posts

Popular Posts
CRL-Horizontal-Laptop-Beige-Floral-Painting.jpg
Creative Retreat Live
Rainbow-Watercolor-Wreath-Using-Markers.JPG
Rainbow Wreath Tutorial
15 Ways to Journal by Jessica on BrownPaperBunny
15 Ways to Journal
Tombow Brush Pen Markers and Colored Pencils
Brown Paper Bunny

Privacy + Terms of Use

Shop

Watercolor with Markers Book

Classes

Art Tutorials

Art & Illustration Portfolio

About

Contact

Custom Book Print

Custom Book Mug

How to Paint Watercolor Flowers Using Markers

Free Fashion Croquis

Start an Art Journal

6 Easy Flowers to Draw with Tombow Markers

Make Your Own Watercolor Bookmarks